How to set up an OKX Signal Trading bot with TradingView
With the launch of Signal Bots, TradingView users and signal suppliers can now publish and set up a Signal Bot with their TradingView signals. Follow the step-by-step guide below to start trading with signals on OKX.
Kindly use the following link to access a comprehensive guide detailing the specifications for alert messages: Alert Message Specifications.
Should you encounter any difficulties, please consult the guide containing a list of frequently asked questions in FAQs. This resource is designed to assist you in resolving any issues you may encounter while using the product.
Table of Contents
- Step 1: Access the Signal Bot
- Step 2: Create your Signal
- Step 3: Configure TradingView alerts
- Step 3.1: TradingView Strategy Scripts Guide
- Step 3.2: TradingView Indicator/Study Guide
- Step 3.3: Chart Analysis Guide
- Step 3.4: Third-party Programs Guide
- Step 4: Set up your Signal Bot
- Step 5: Monitor & Manage Signal Bot
- Appendix A: MACD Script with alertcondition( ) + Alert Manual Setup
- Appendix B: Python Webhook Request Example
- Alert Message Specifications
- FAQs
Step 1: Access the Signal Bot
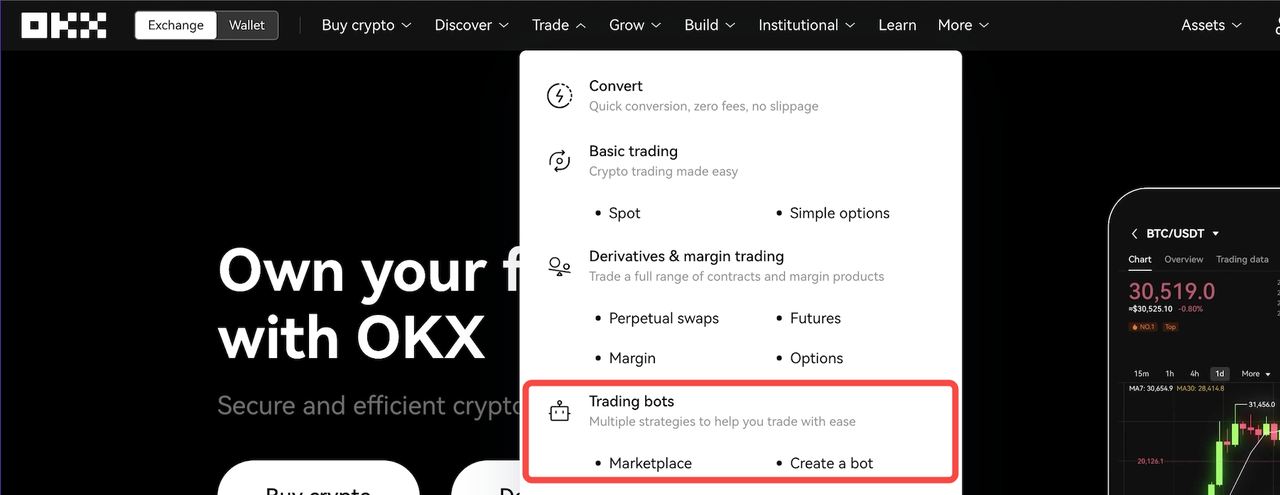
Log in to your OKX account, navigate to Trade -> Trading Bots -> Marketplace.
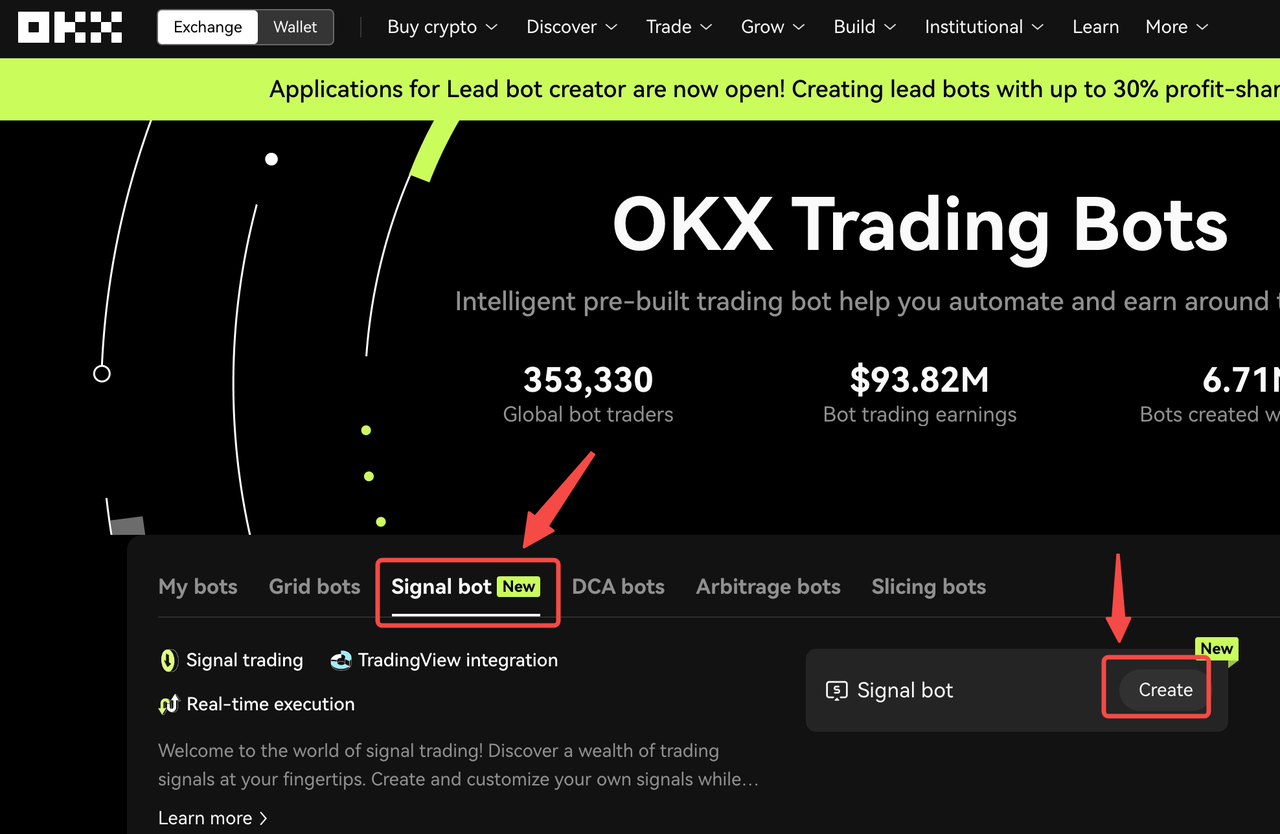
Next, select the Signal Bot sub-tab, and select 'Create'.
Step 2: Create your Signal
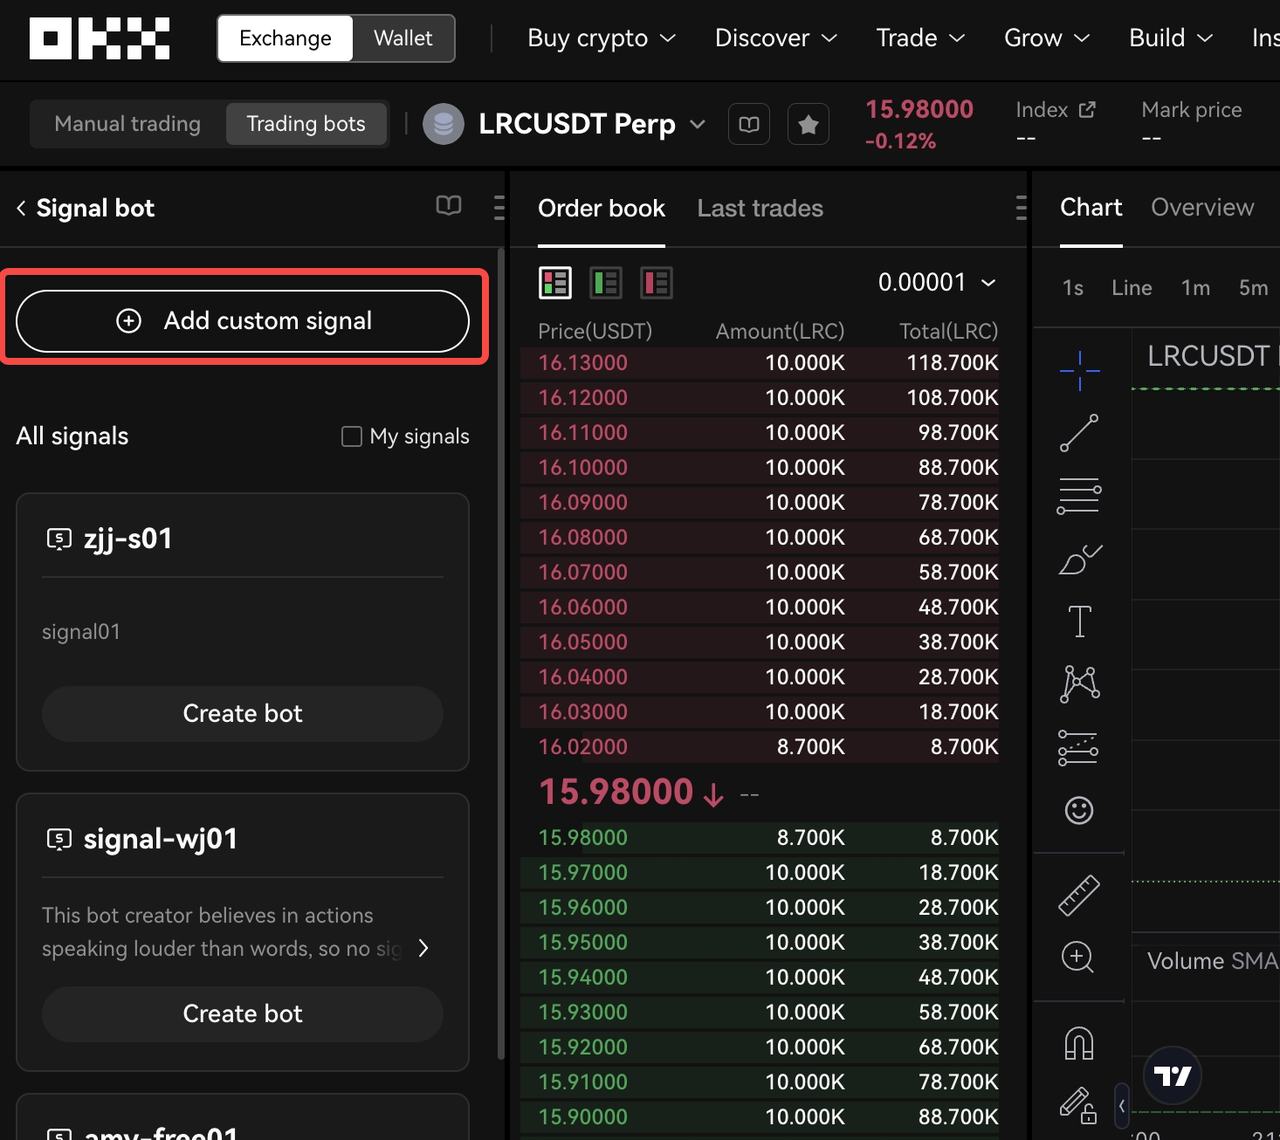
You'll find a button to create your custom signal. Select 'Add custom signal' to get started.
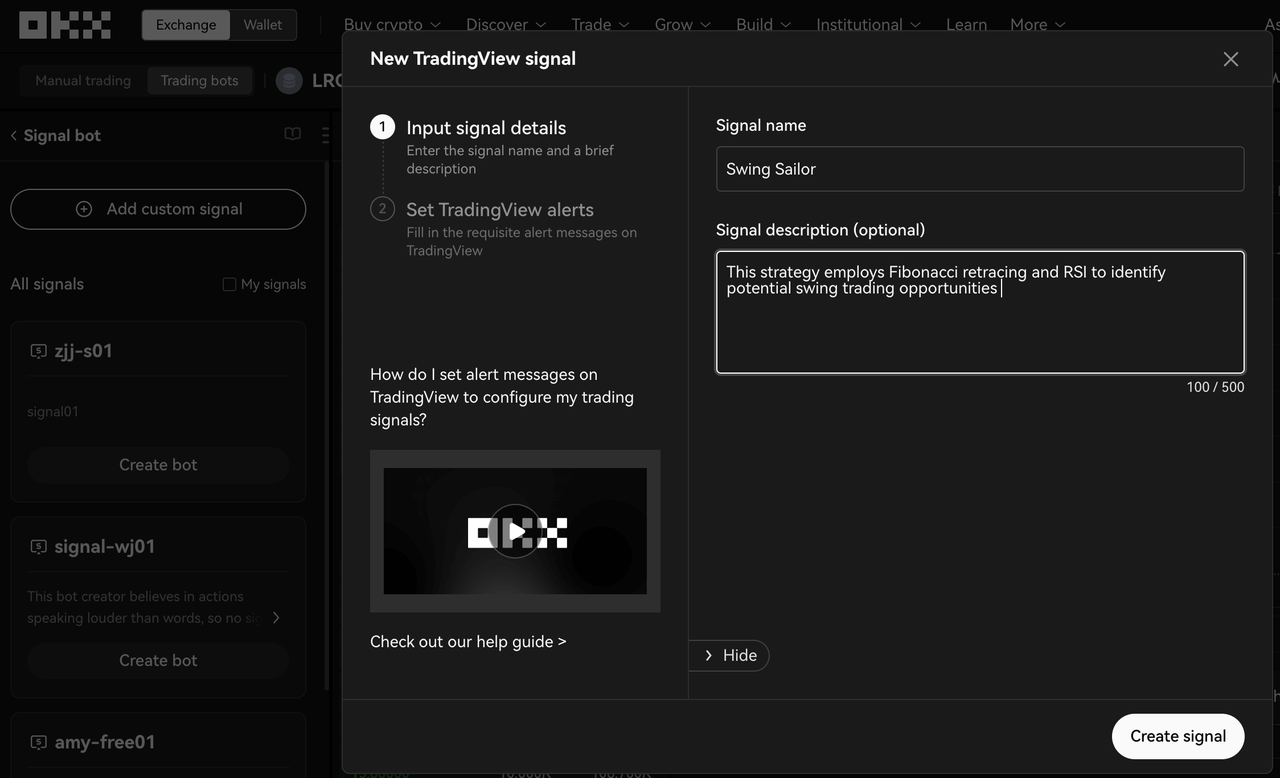
We have simplified the experience to help our users quickly set-up their TradingView signals. In the first step, you may name your signal and insert an optional description of the signal (up to 500 characters long). Once done, select 'Create signal' to move to the next step.
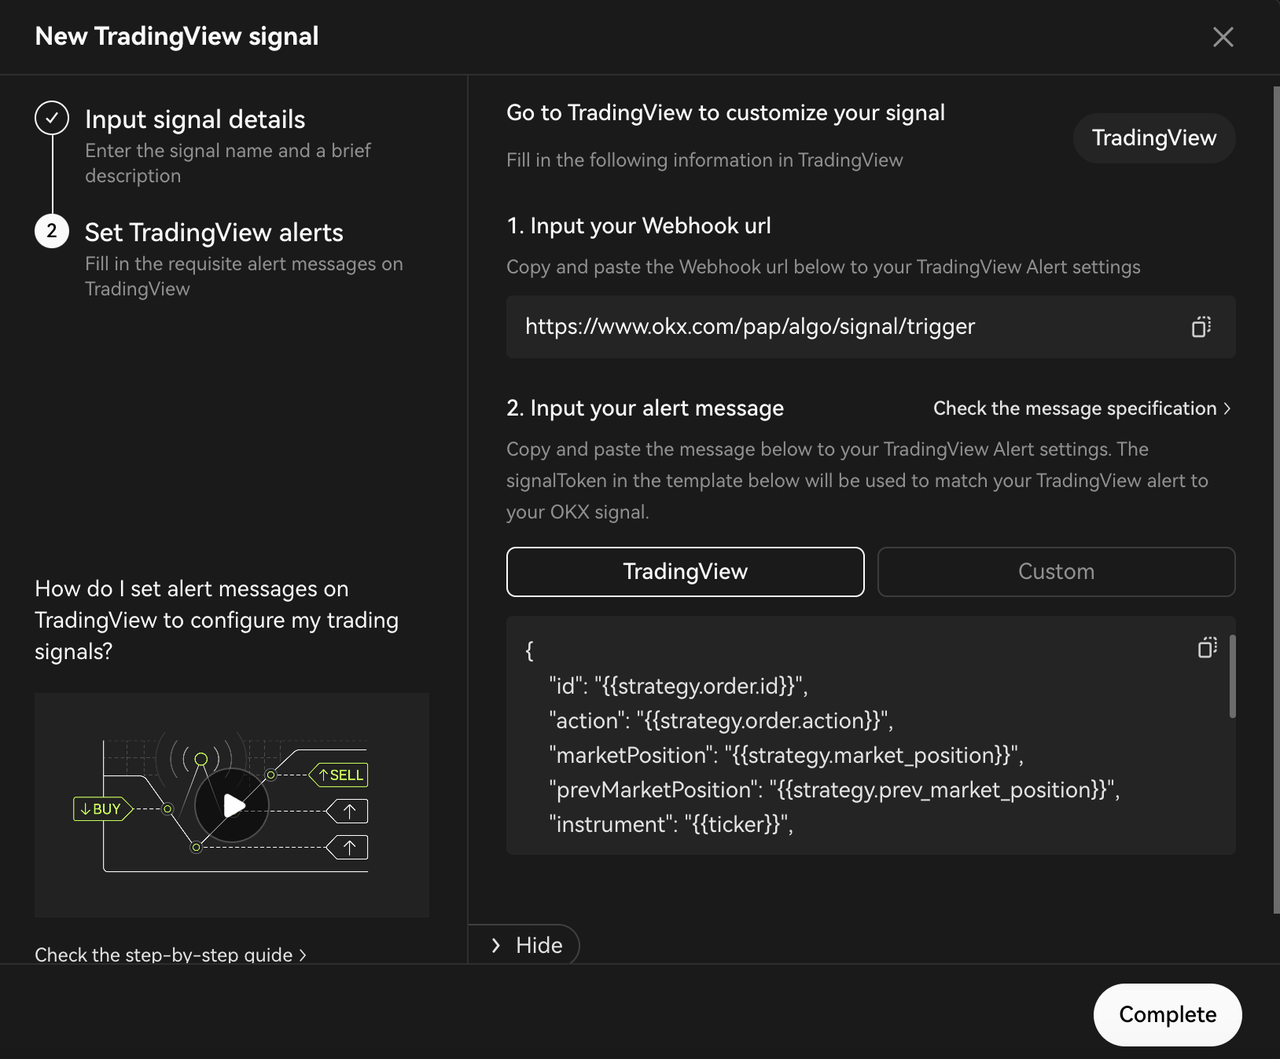
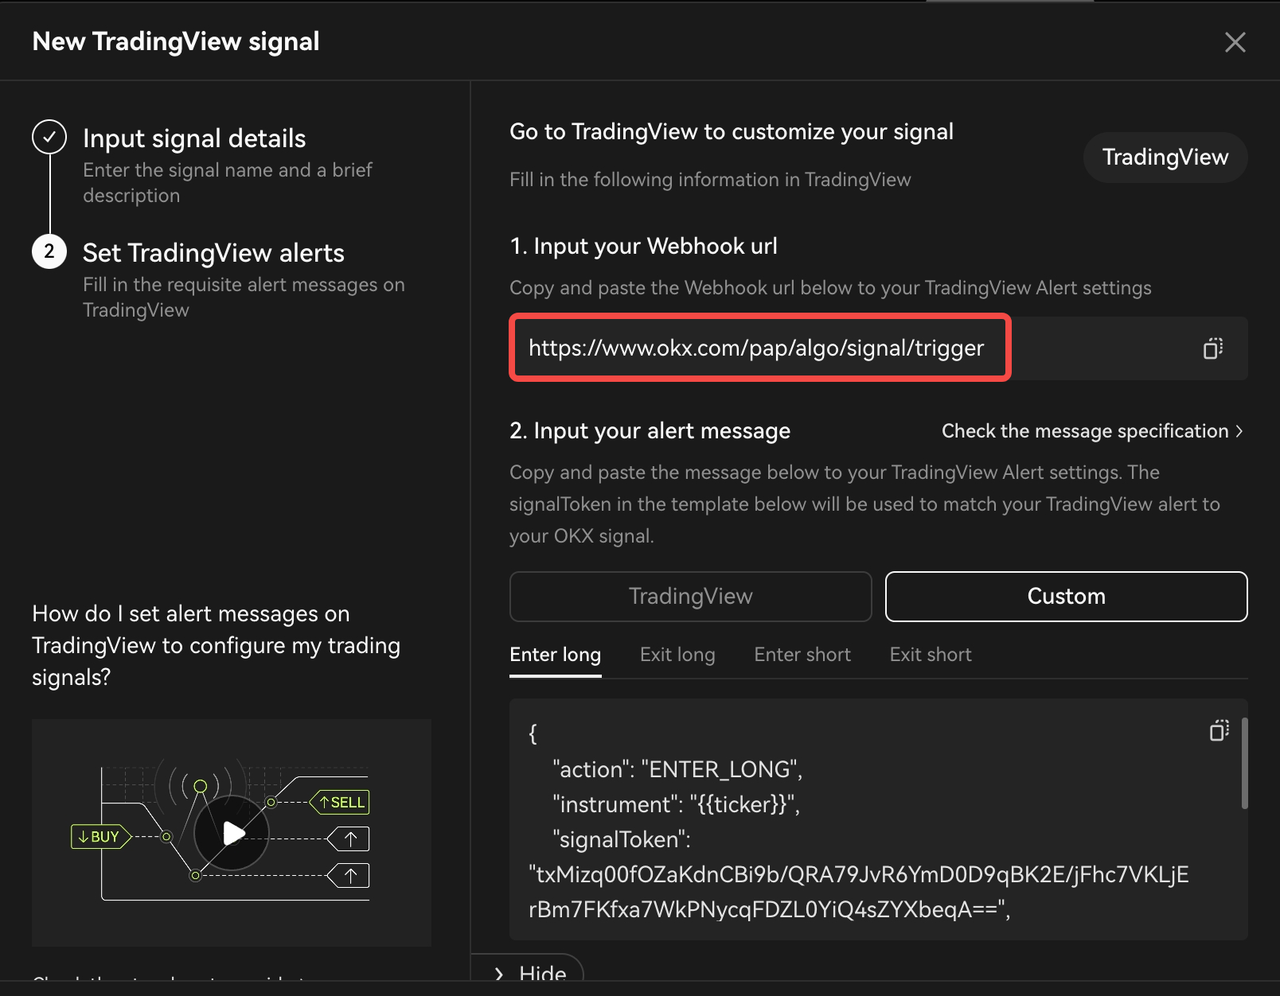
After selecting 'Create', you will be shown the next page that prompts you to add the Webhook URL and AlertMsg Specification that is auto-generated by OKX. From here, you will be setting up the signal push on TradingView. Keep in consideration the two distinct methods for configuring alerts:
- "TradingView": Geared towards users who utilize TradingView strategy scripts, particularly those employing strategy.*() functions for signal transmission.
- "Custom": Designed to cater to a wider range of users, including those using TradingView indicators, alerts via charting, as well as providers utilizing third-party programs.
An Express Overview of Pine Script™: "Strategy" vs "Indicator"
| Pine Script™ Type | Description | |
|---|---|---|
 1. TradingView strategy 1. TradingView strategy |
Pine Script™ strategies serve the purpose of conducting backtesting on historical data as well as forward testing in live markets. Alongside performing indicator calculations, strategies include calls to strategy.*() functions that transmit trade orders to Pine Script™’s broker emulator. This emulator can then simulate the execution of these orders. The outcomes of backtests are visualized in the "Strategy Tester" tab located at the bottom of the chart, adjacent to the "Pine Script™ Editor" tab. | If you're using TradingView strategy scripts with the strategy.*() functions**,proceed directly to Step 3.1: TradingView strategy.*() functions to get started. |
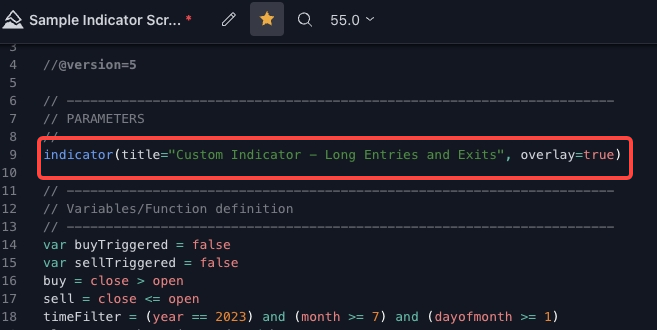 2. TradingView indicator 2. TradingView indicator |
On the other hand, Pine Script™ indicators also involve calculations, but they are not intended for use in backtesting scenarios. Due to their independence from the broker emulator, indicators consume fewer resources and execute more swiftly. Alternatively, these are also known as study scripts and not indicators in PineScript™ v4. | For users employing indicators/study scripts and third-party programs,skip ahead to Step 3.2, Step 3.3 and Step 3.4 based on your specific use case. This section is tailored for more general use cases, encompassing users who rely on TradingView indicators, alerts through charting, and providers utilizing third-party programs. |
Step 3: Configure TradingView alerts
Kindly use the following link to access a comprehensive guide detailing the specifications for alert messages: Alert Message Specifications.
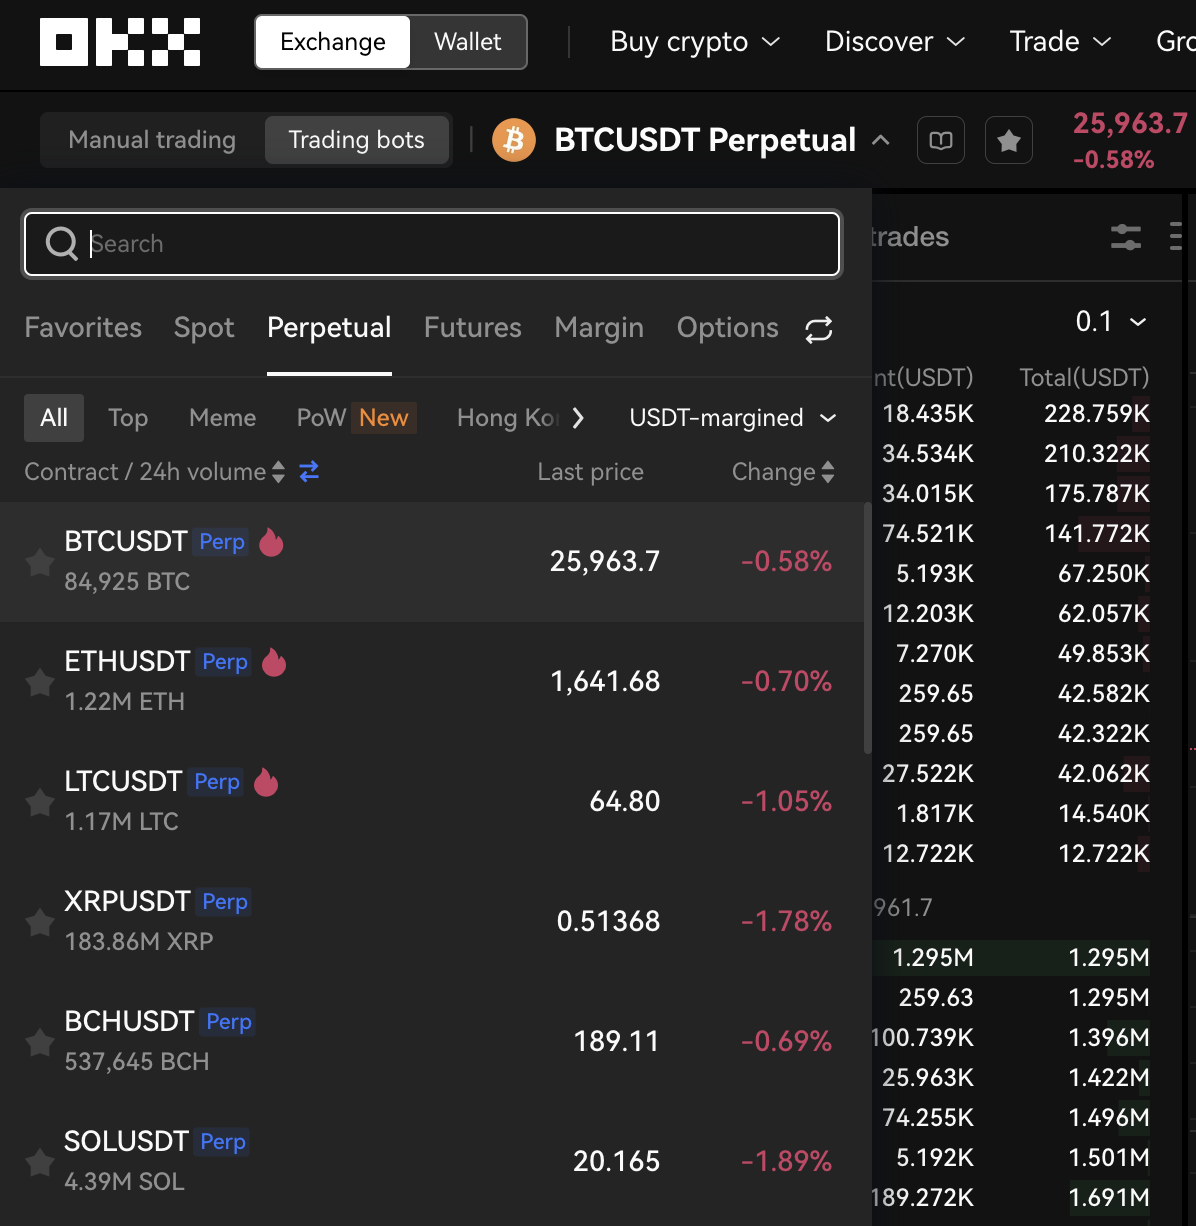
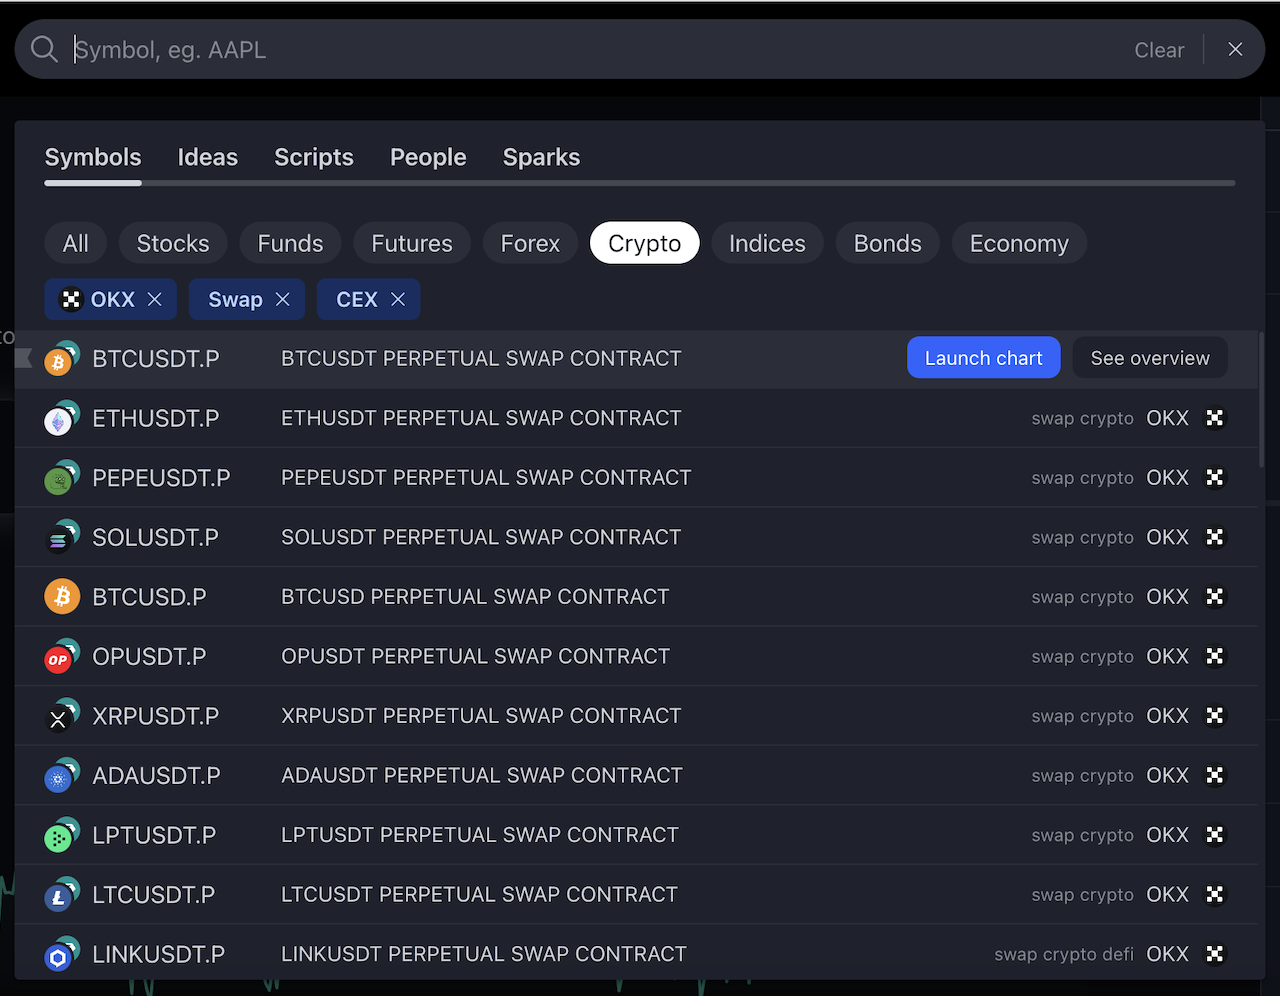
To begin, open TradingView and pick the trading pair you want to work with. (Please ensure you're selecting the appropriate perpetual swap contract.)
You can access the complete list of perpetual swaps supported on OKX through the pair selection list available on the Trade page.
Step 3.1【TradingView Strategy Scripts Guide】:For Pinescript™ strategy creators who utilize the strategy.*() functions
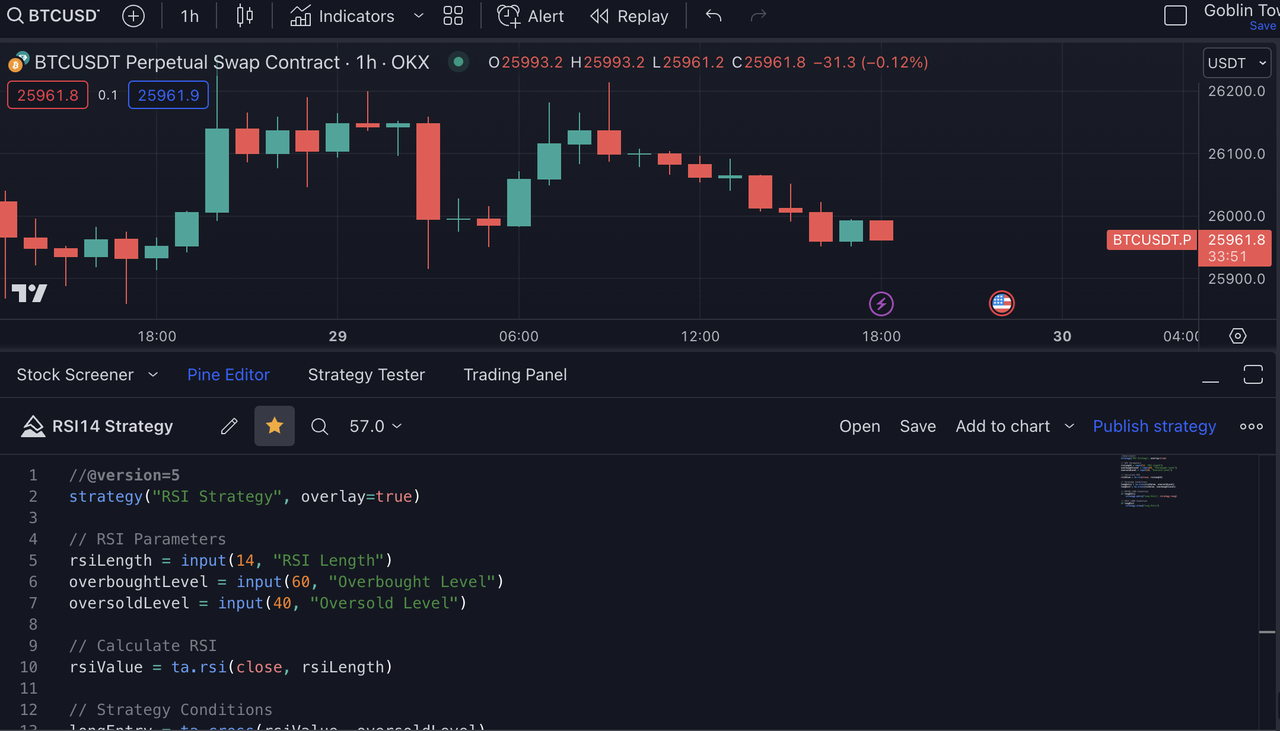
Step 1: Configure your strategy script in Pine Editor, and click "Save" and "Add to chart". Alternatively, if you have an existing strategy script, add it to your chart.
Step 2: Select the gear icon associated with the strategy you've added to your chart. Adjust your strategy properties like your order size according to your preferences. Once done, click "Ok" to finalize the settings.
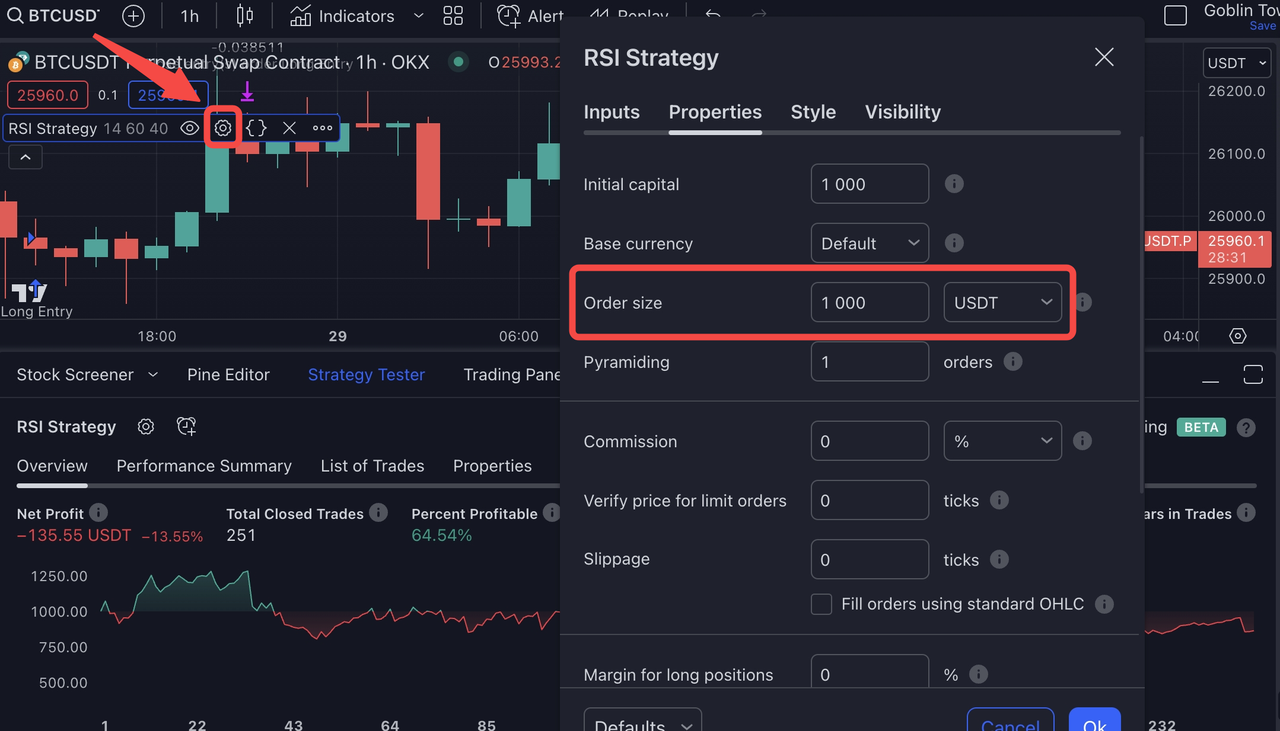
How do I align my TradingView strategy order settings with OKX?
In your TradingView strategy, you have three options for configuring order parameters: You can define your "order size" in terms of USDT, the number of contracts, or as a percentage of equity based on your Initial Capital. While all of these approaches can ultimately be adapted for use on OKX, it's essential to have a clear understanding of how each method operates on TradingView and how it translates onto the OKX platform. Here's a concise overview of the different scenarios to guide you through this process.
1. Order size: USDT
This approach is straightforward and user-friendly. You input your order size directly in absolute terms using your quote currency, USDT. When conducting TradingView backtesting, this value will serve as the basis for all your order placements.
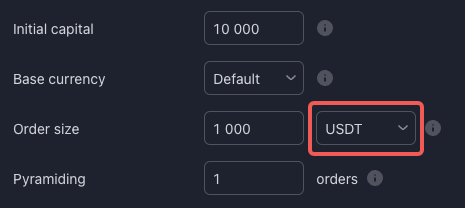
To ensure seamless compatibility with OKX, remember to set your "investmentType" to "base" and configure "amount" as "{{strategy.order.contracts}}". By following these specifications, your order on OKX will align precisely with your intended TradingView strategy.
{
  "id": "{{strategy.order.id}}",
  "action": "{{strategy.order.action}}",
  "marketPosition": "{{strategy.market_position}}",
  "prevMarketPosition": "{{strategy.prev_market_position}}",
  "instrument": "{{ticker}}",
  "signalToken": "********",  //enter the signalToken for your signal
  "timestamp": "{{timenow}}",
  "maxLag": "60",
  "investmentType": "base",
  "amount": "{{strategy.order.contracts}}"
}
2. Order size: Contracts
A pivotal distinction to recognize is that the concept of "contracts" is defined differently on TradingView and OKX. On TradingView, a contract represents a single unit of the perpetual swap at the prevailing price (equivalent to one unit of base currency i.e. one contract of BTCUSDT perp is equivalent to purchasing 1 BTC worth). Conversely, on OKX, the "contract sizes" are unique for each perpetual swap contract (e.g. One contract of BTCUSDT perp is equivalent to purchasing 0.01 BTC worth). Comprehensive information about OKX contract sizes is available here: https://www.okx.com/trade-market/info/swap.
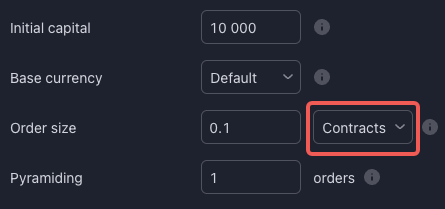
To ensure seamless alignment with OKX, it's vital to configure your "investmentType" as "base" and set "amount" to "{{strategy.order.contracts}}". Notably, on TradingView, the "{{strategy.order.contracts}}" placeholder effectively corresponds to the amount in the base currency. This choice of "investmentType" as "base" facilitates direct compatibility. Adhering to these specifications guarantees that your orders on OKX perfectly mirror your intended TradingView strategy.
{
  "id": "{{strategy.order.id}}",
  "action": "{{strategy.order.action}}",
  "marketPosition": "{{strategy.market_position}}",
  "prevMarketPosition": "{{strategy.prev_market_position}}",
  "instrument": "{{ticker}}",
  "signalToken": "********",  //enter the signalToken for your signal
  "timestamp": "{{timenow}}",
  "maxLag": "60",
  "investmentType": "base",
  "amount": "{{strategy.order.contracts}}"
}
3. Order size: % of equity
When utilizing "% of equity," it's crucial to comprehend that your equity commences with the value you specify as your Initial Capital. Subsequently, your equity is defined and evaluated through your TradingView backtesting.
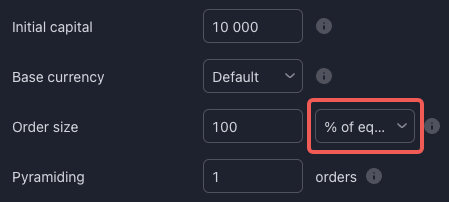
While it's possible to emulate this by configuring "investmentType" as "base" and "amount" as "{{strategy.order.contracts}}" (as depicted below), it's essential to bear in mind that the values derived from this method are heavily influenced by backtesting calculations. In a real-world scenario, discrepancies between backtesting and live trading can occur, as backtesting is designed for approximate estimations rather than precise order execution. Therefore, it's advisable to set your order size definitions in either USDT or contract terms on TradingView.
{
  "id": "{{strategy.order.id}}",
  "action": "{{strategy.order.action}}",
  "marketPosition": "{{strategy.market_position}}",
  "prevMarketPosition": "{{strategy.prev_market_position}}",
  "instrument": "{{ticker}}",
  "signalToken": "********",  //enter the signalToken for your signal
  "timestamp": "{{timenow}}",
  "maxLag": "60",
  "investmentType": "base",
  "amount": "{{strategy.order.contracts}}"
}
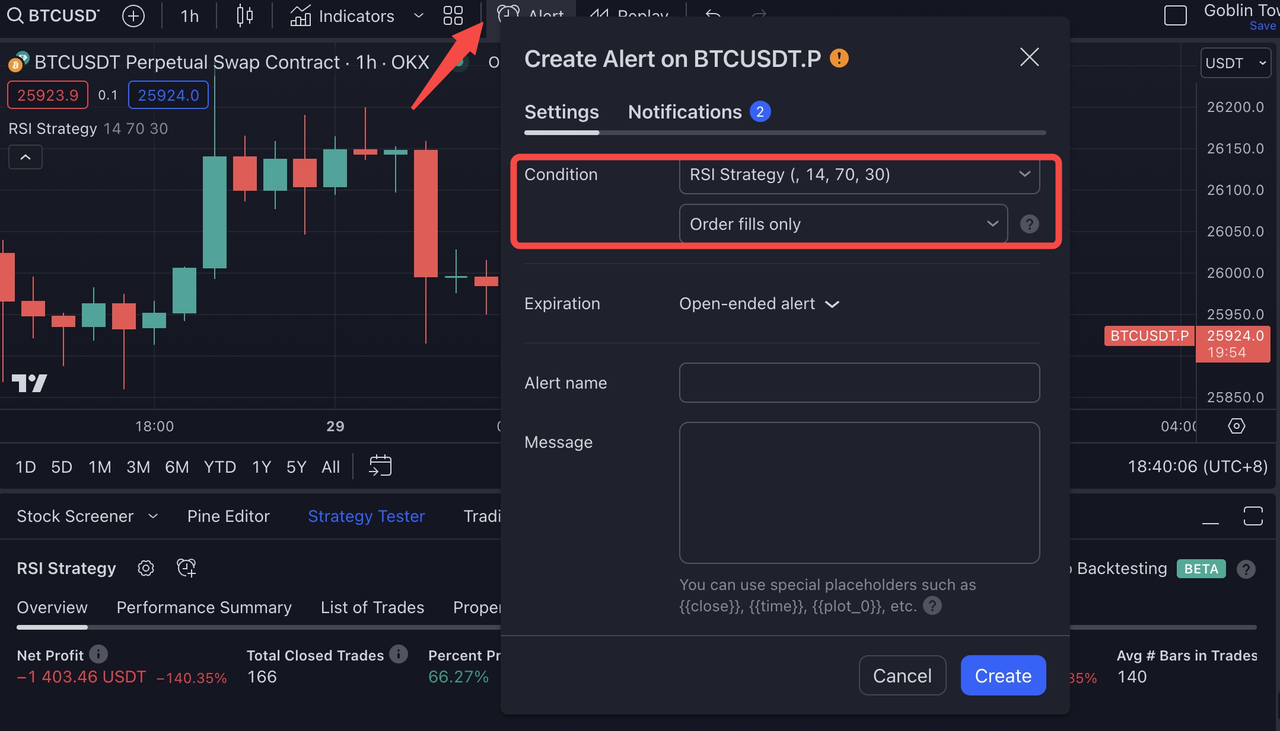
Step 3: Click on the "Alert" on the top toolbar, and change "Condition" to the script just added to the chart with "Order fills only". The expiration could also be selected as "Open-ended alert" for convenience.
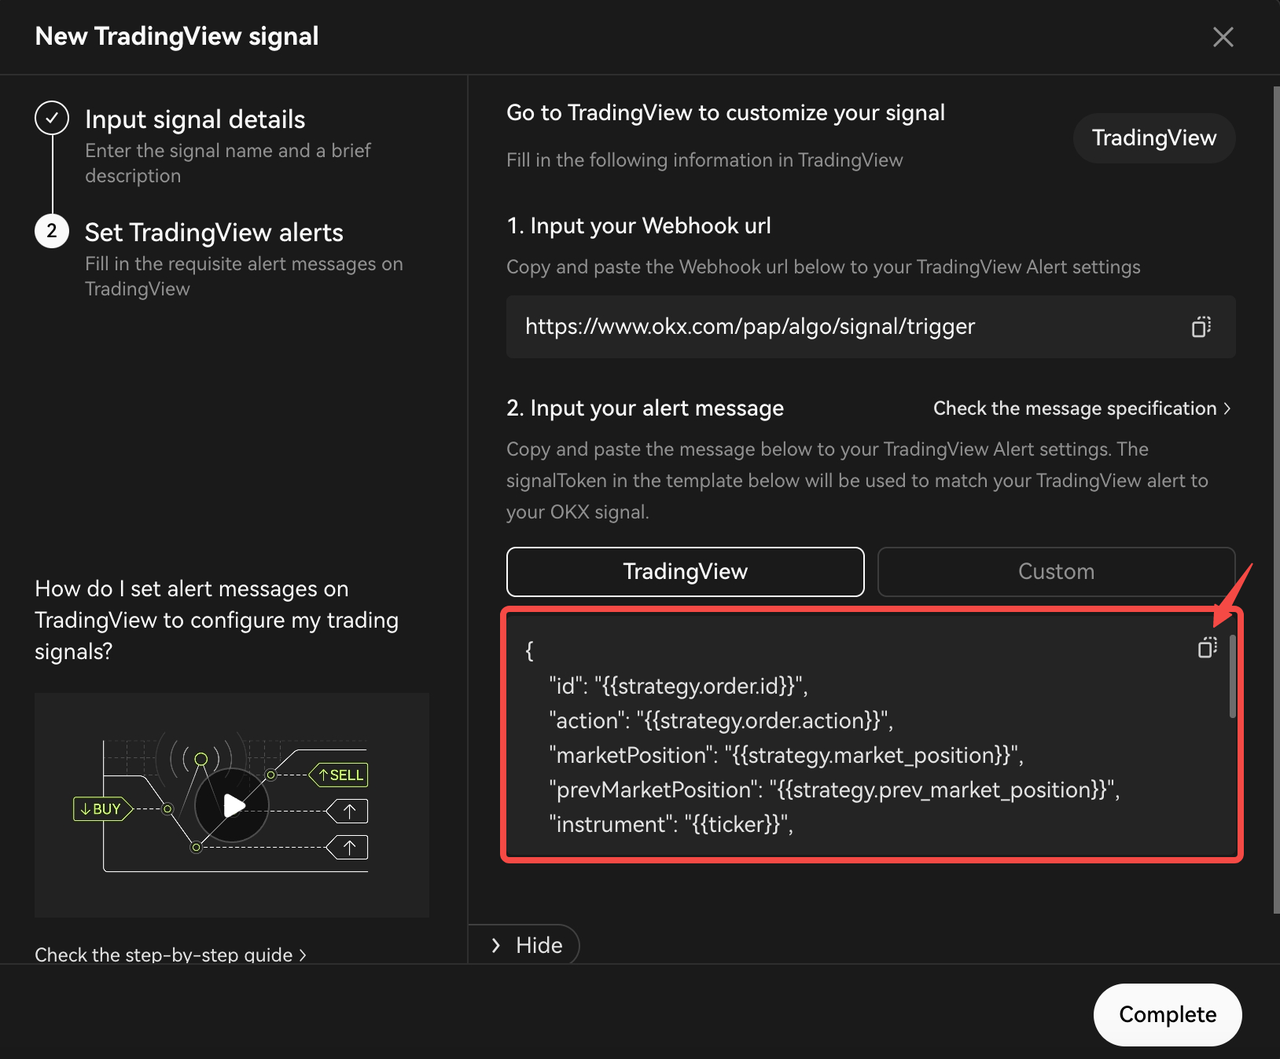
Step 4: Retrieve the alert message template from the TradingView tab within the OKX Alert Message Specification on your OKX Signal. Subsequently, paste this template into the "Message" section of your TradingView alert, along with a corresponding Alert Name of your choosing.
If you wish to make any modifications to the recommended template for your alert message, you're welcome to do so, ensuring that the changes adhere to our Alert Message Specifications provided here.
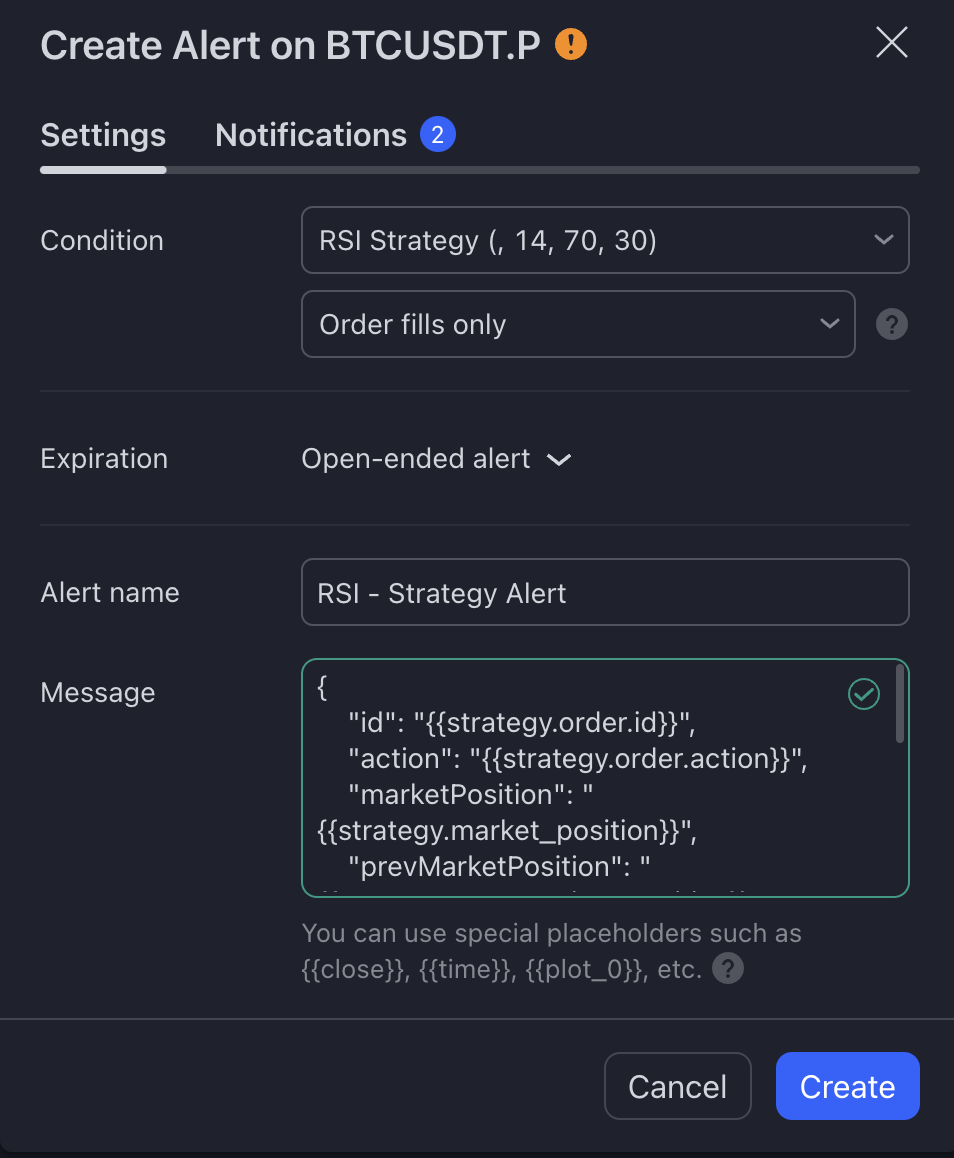
Step 5: Choose the Webhook URL section* in "Notifications". Paste the webhook URL copied from OKX to TradingView then click "Create".
*Please note you will need a paid TradingView subscription to be able to access this feature
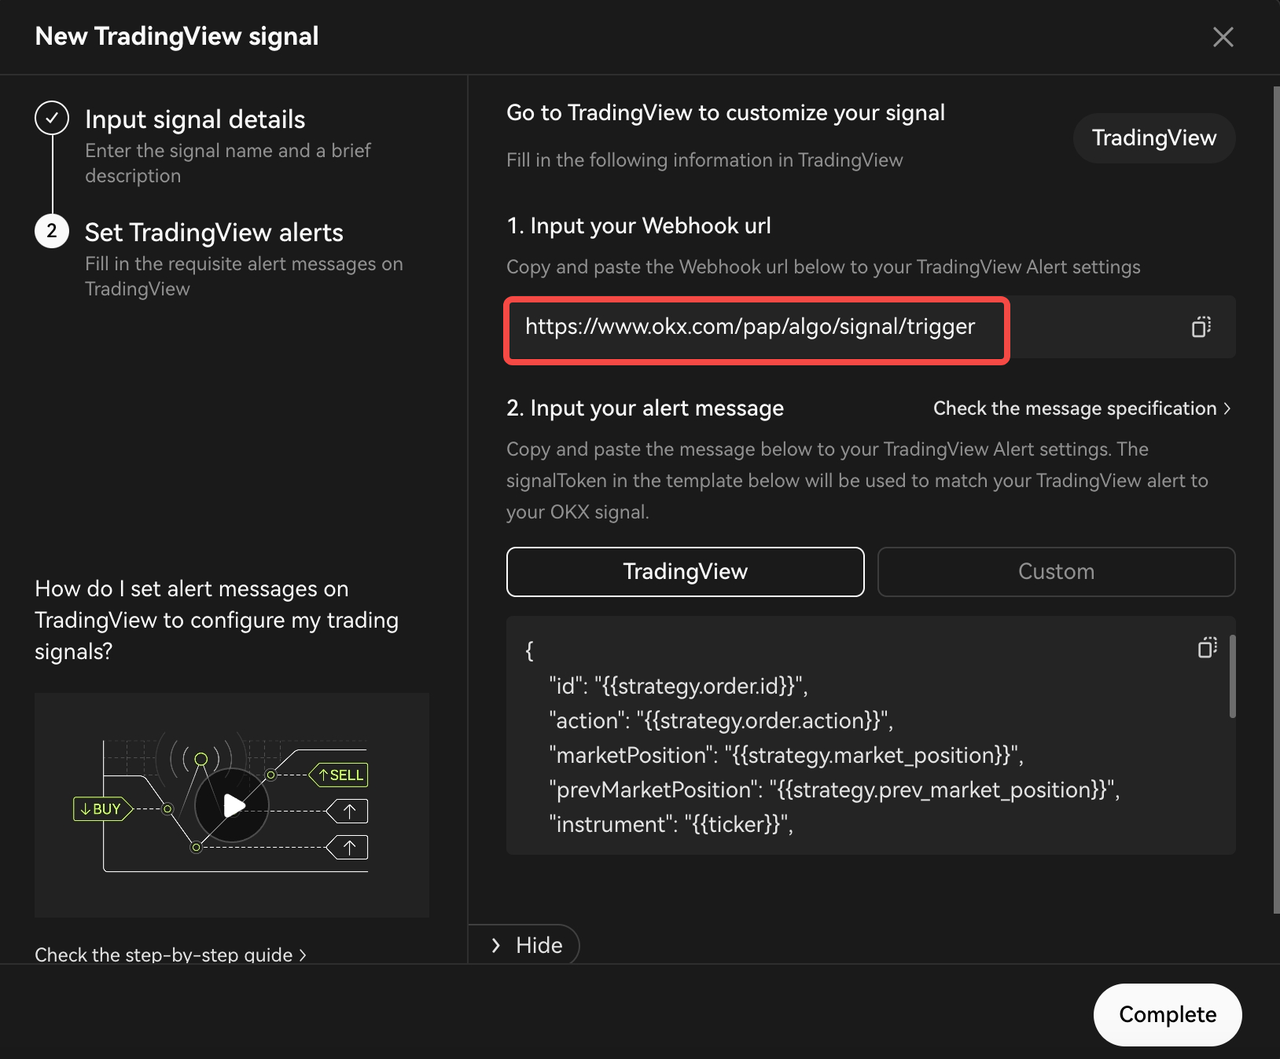
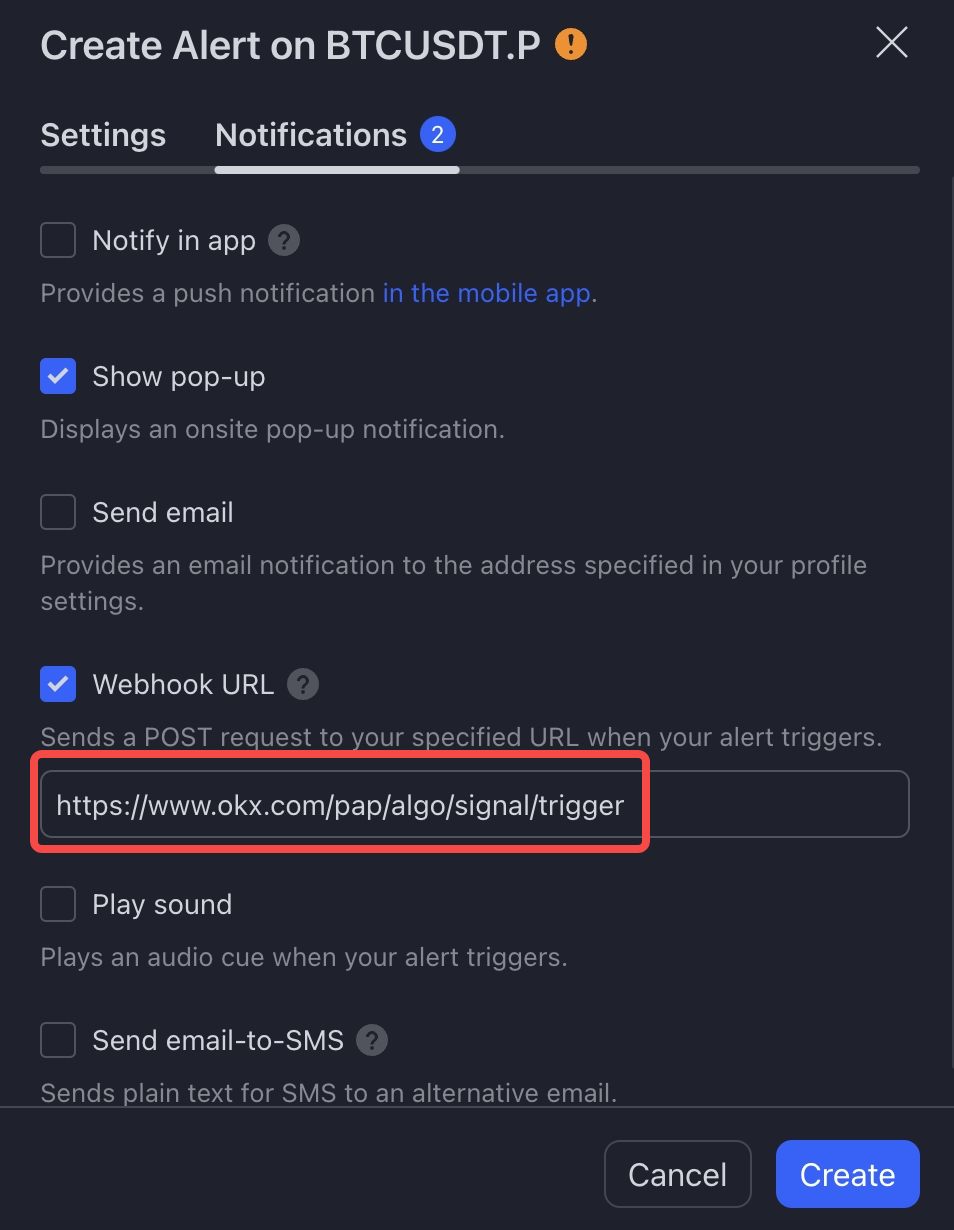
Step 3.2【TradingView Indicator/Study Guide】for Pinescript™ indicator/study script creators
Step 1: Configure the script in Pine Editor, and click "Save" and "Add to chart"

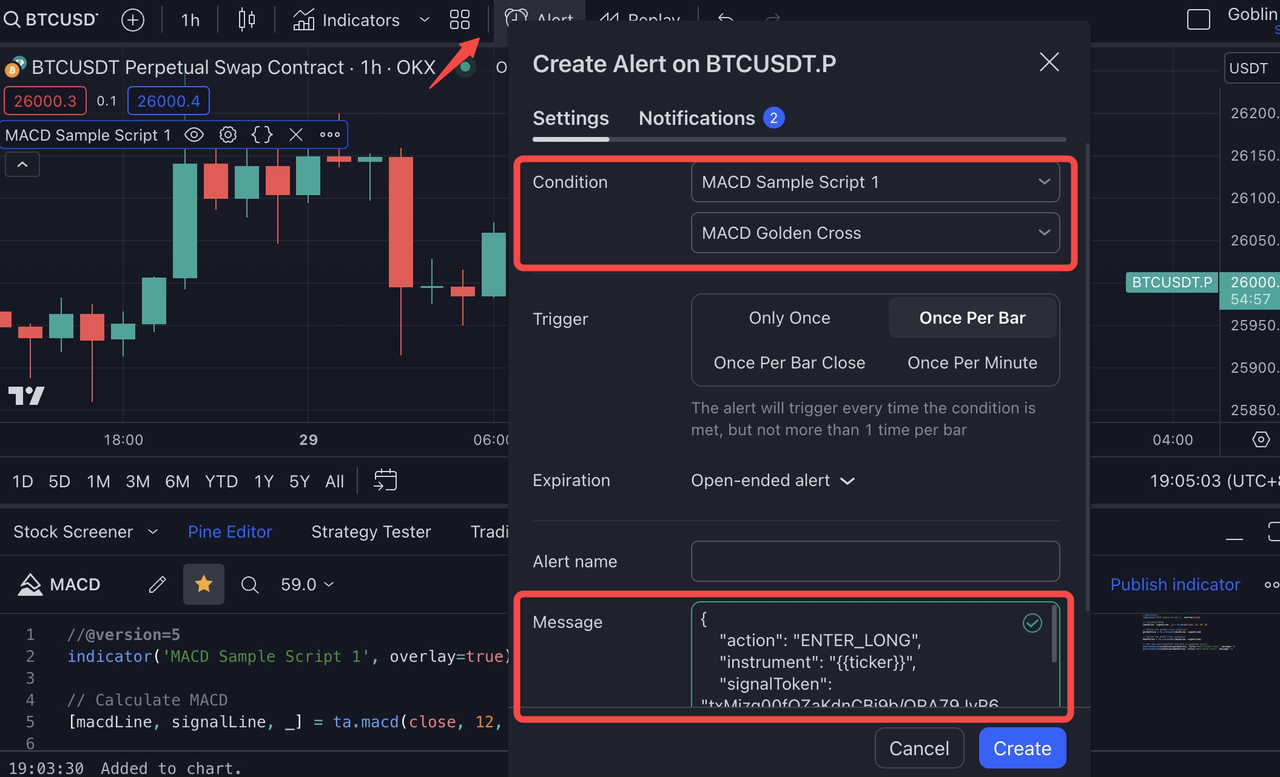
Step 2: Click on the "Alert" on the top toolbar, and change "Condition" to the script just added to the chart with the corresponding AlertCondition. In this case, MACD Golden Cross is used together with the ENTER_LONG Message Template. The expiration could also be selected as "Open-ended alert" for convenience.
Lastly, retrieve the alert message template from the Custom tab within the OKX Alert Message Specification on your OKX Signal. Subsequently, paste this template into the "Message" section of your TradingView alert, along with a corresponding Alert Name of your choosing.
If you wish to make any modifications to the recommended template for your alert message, you're welcome to do so, ensuring that the changes adhere to our Alert Message Specifications provided here.
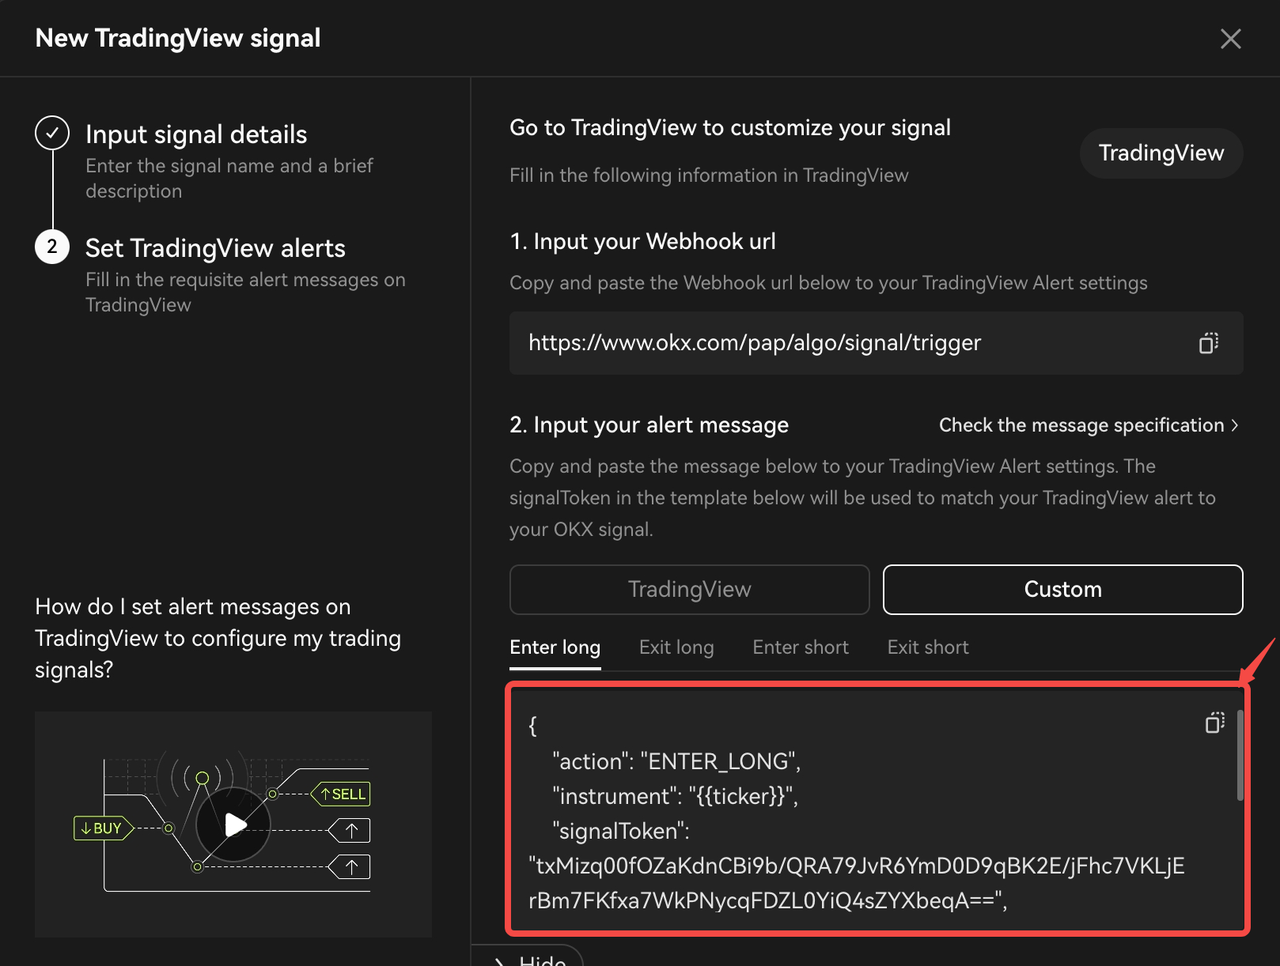
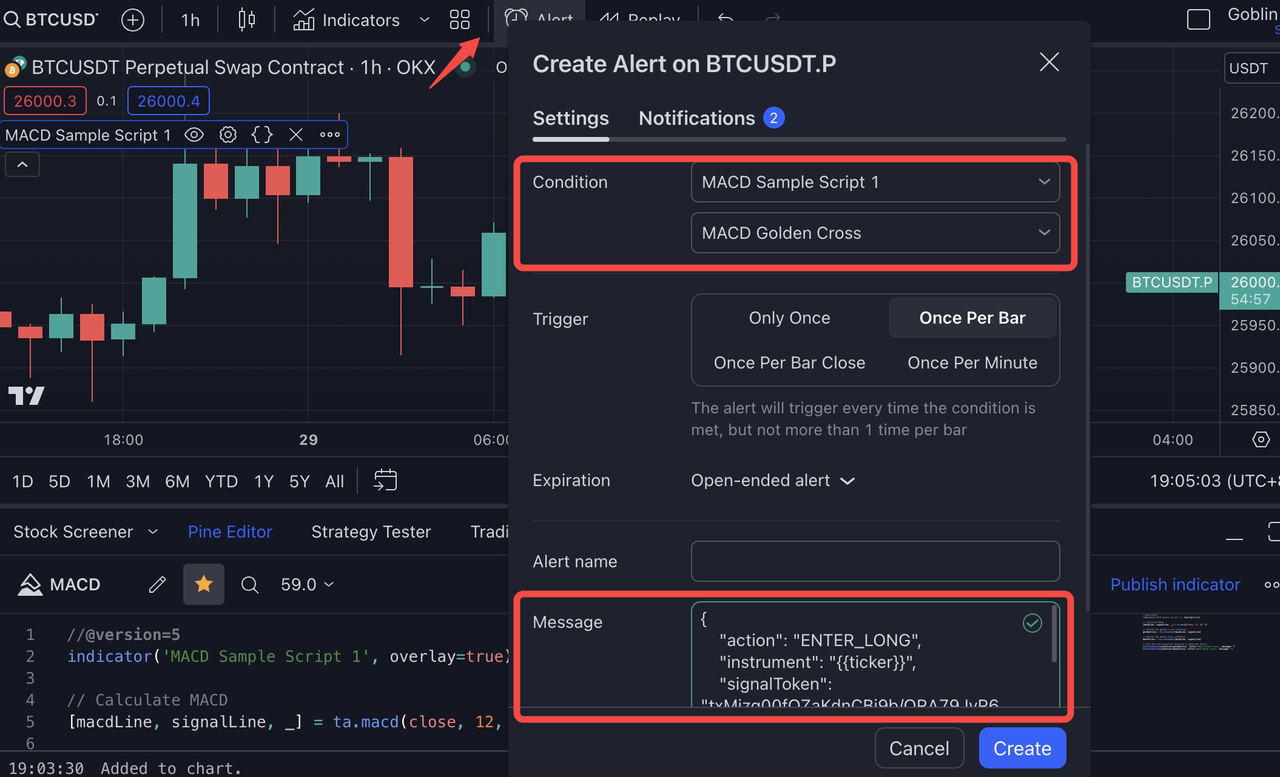
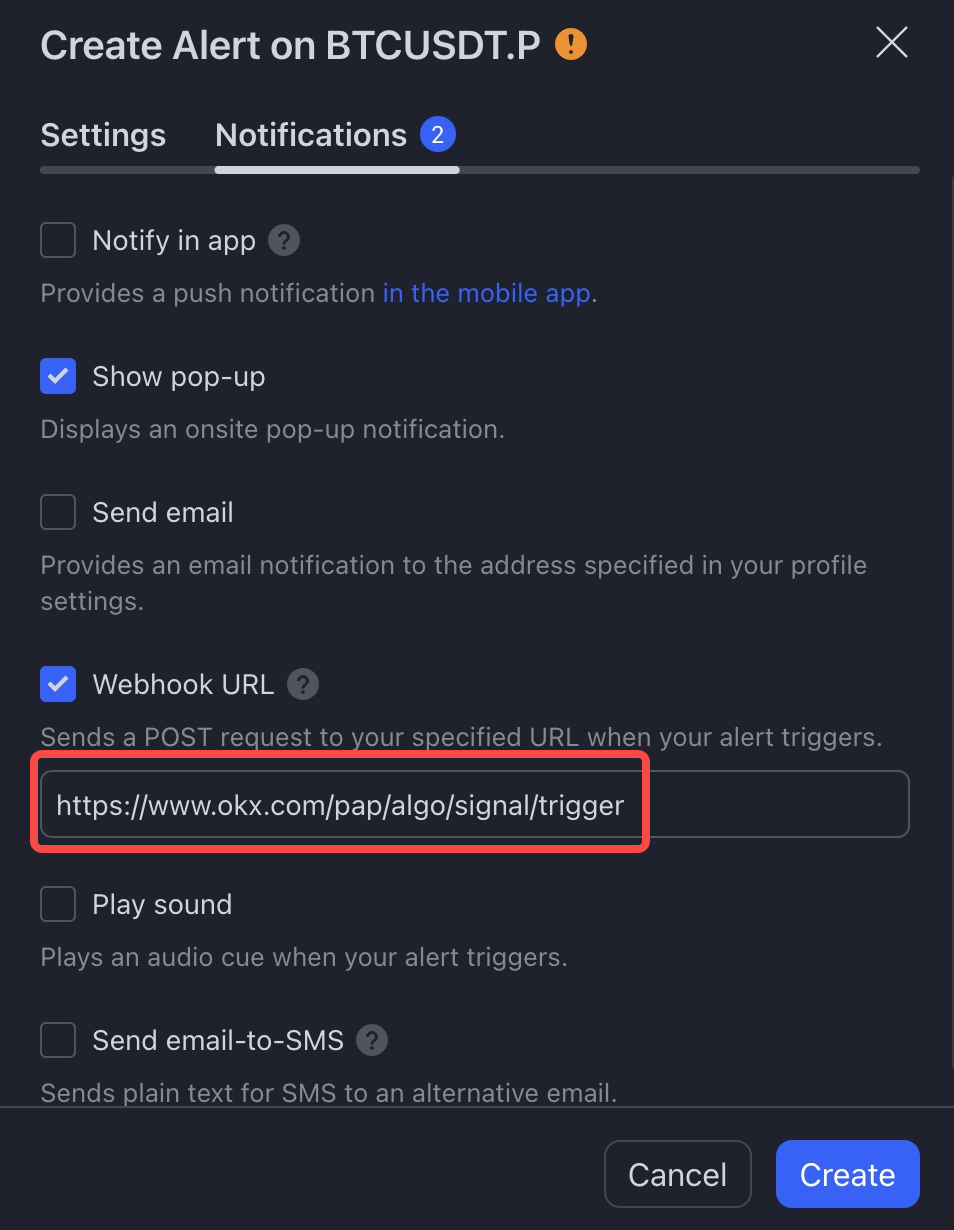
Step 3: Choose the Webhook URL in "Notifications". Paste the webhook URL copied from OKX to TradingView then click "Create".
Step 3.3【Chart Analysis Guide】for users employing chart analysis and/or basic indicator lines
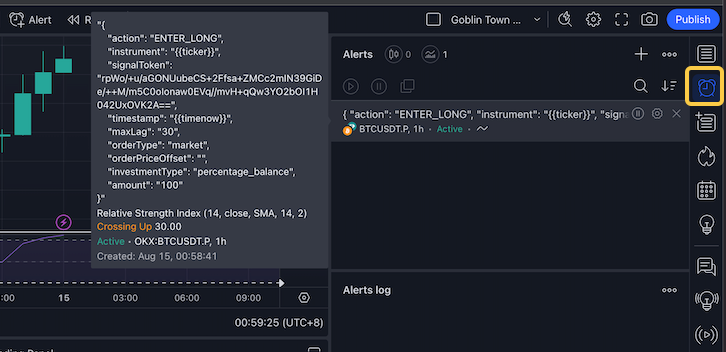
Step 1: Click on the "Alert" button on the top toolbar, and set your condition based on what you normally trade on (e.g. RSI-14 crossing up 30)
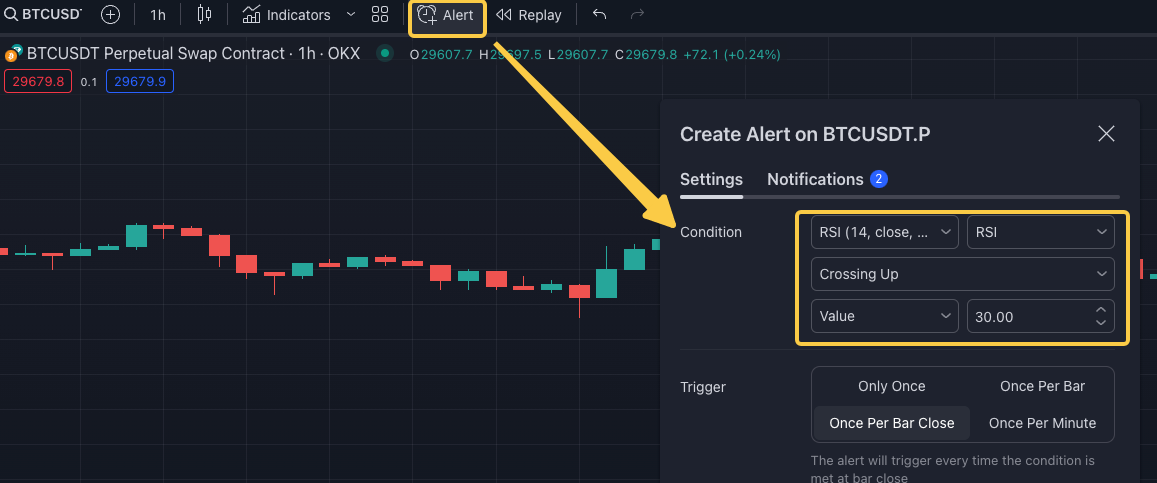
Next, paste the OKX AlertMsg Specifications under "Message". Learn more about the OKX AlertMsg Specifications here.
IMPORTANT: We support 4 different types of messages with different actions (i.e., ENTER_LONG, EXIT_LONG, ENTER_SHORT, EXIT_SHORT). When setting up the alert, please choose the appropriate one depending on your trading logic.
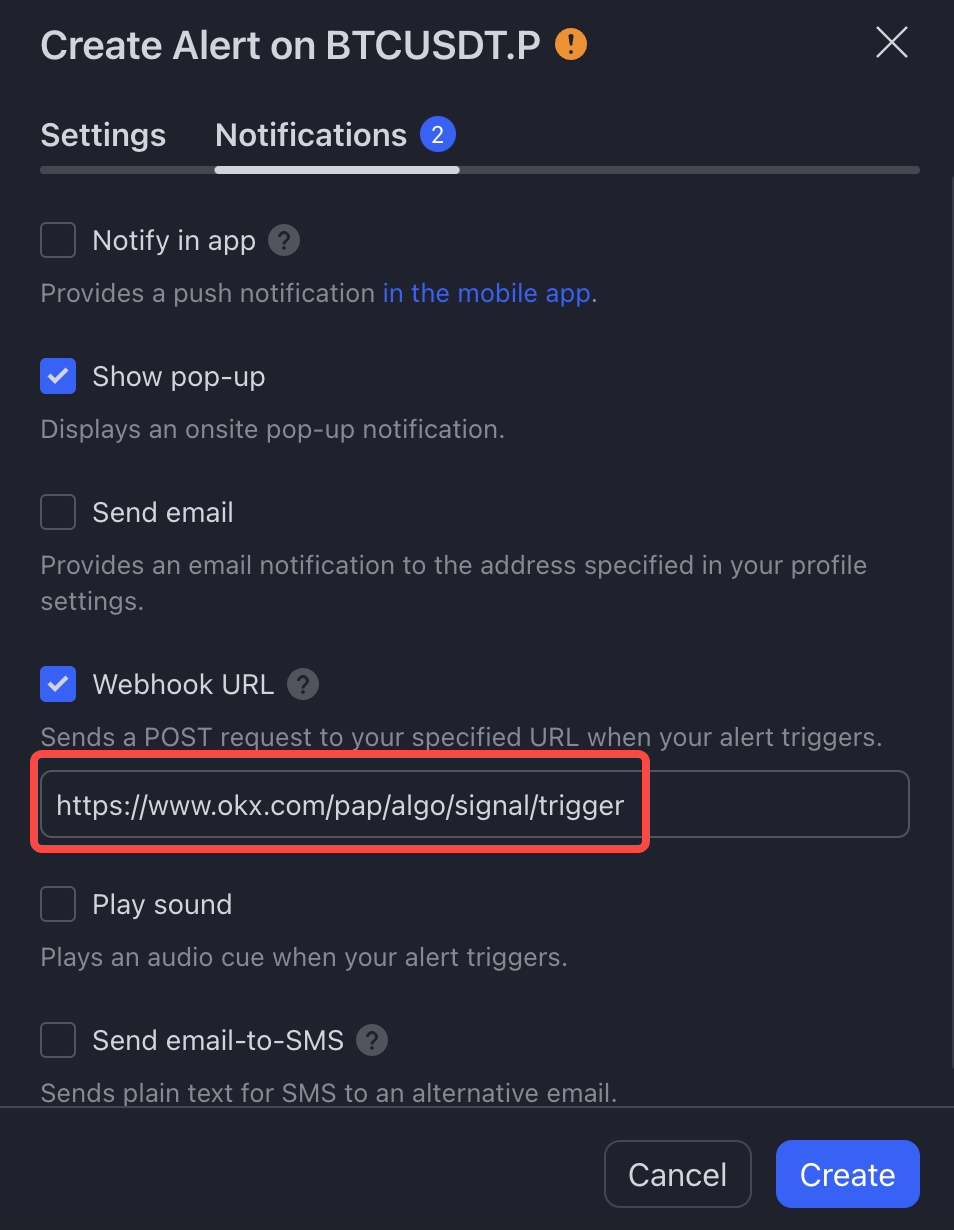
Step 2: Choose the Webhook URL in "Notifications". Paste the webhook URL copied from OKX to TradingView then click "Create".
Step 3: To view the created alert, click on the "Alerts" tab and select the corresponding Alert.
Step 3.4【Third-party Programs Guide】for signal providers transmitting messages from native programs
For configuration using Python as an example request, please refer to Appendix B: Python Webhook Request Example.
Please be aware that if you intend to send a request from a third-party fixed IP address to OKX, kindly reach out to our customer service team or write an email to tradingbot@okx.com with relevant reasoning. This will ensure that your request is appropriately managed by our dedicated processing team. Without following this channel, all external signals will be considered invalid by default.
Step 4: Set up your Signal Bot
Now that you have successfully published your signal on OKX, it is time to connect it to our Signal Bot! To get started, tap on 'Create Bot‘, which will bring you to the Signal Bot creation page.
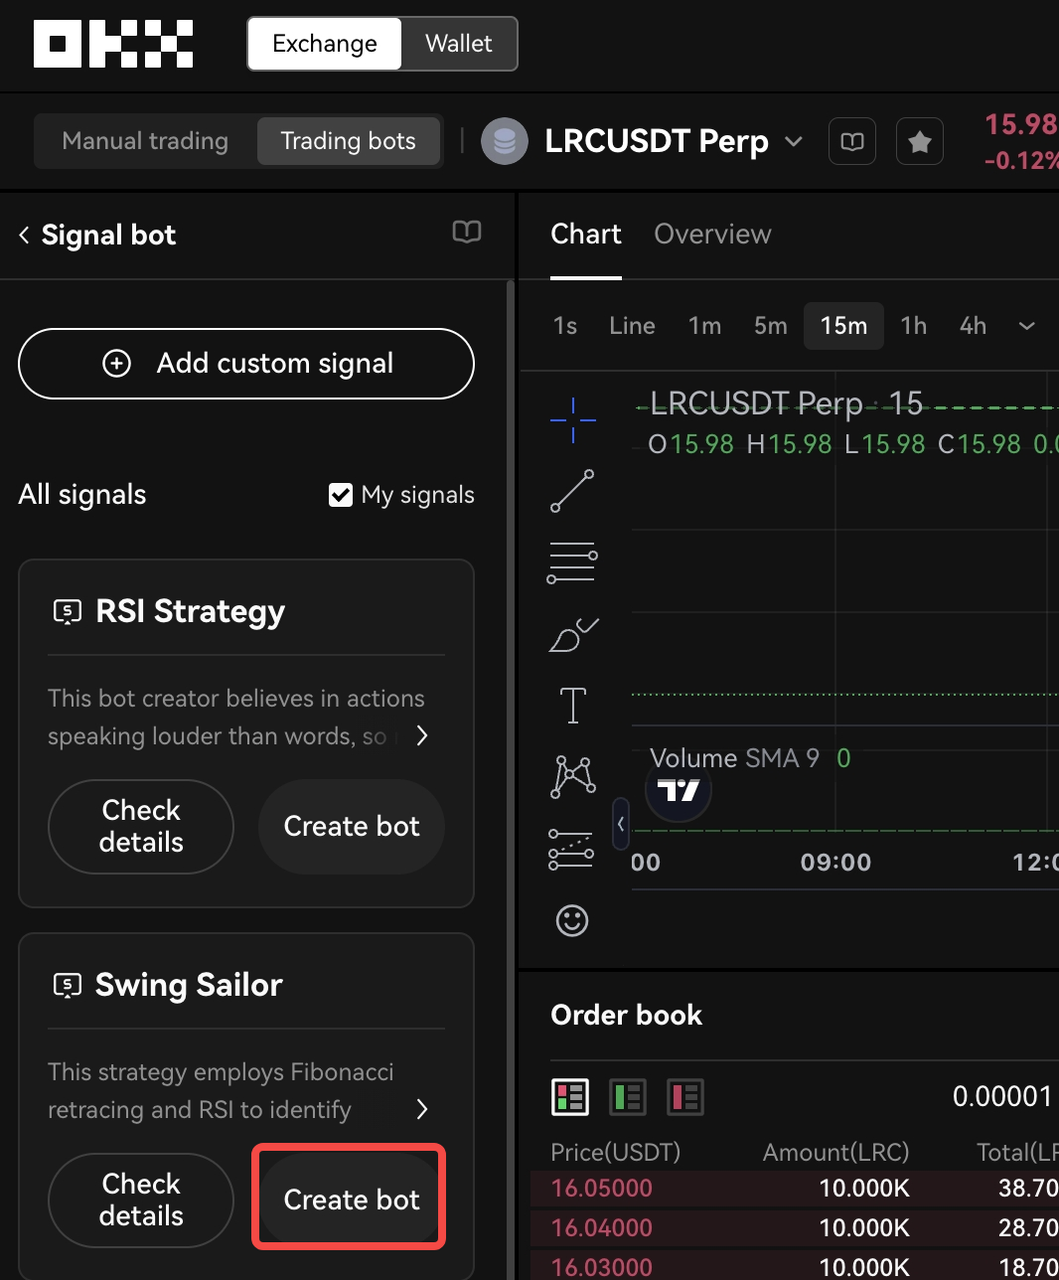
To get started, you'll need to provide the minimum required settings for your bot. These settings include the applicable trading pairs, leverage ratio, and the amount of funds (margin) you want to invest.
Choosing the right trading pairs is essential for your bot to identify suitable opportunities: simply specify the trading pairs that align with your trading strategy. Next, determine the leverage ratio you'd like to apply to your trades. Note that the use of leverage can amplify your potential returns but also comes with increased risk. Make sure to choose a ratio that aligns with your risk tolerance and trading goals. Once you've defined your trading pairs and leverage ratio, it's time to decide on the amount of funds you're willing to invest into the bot.
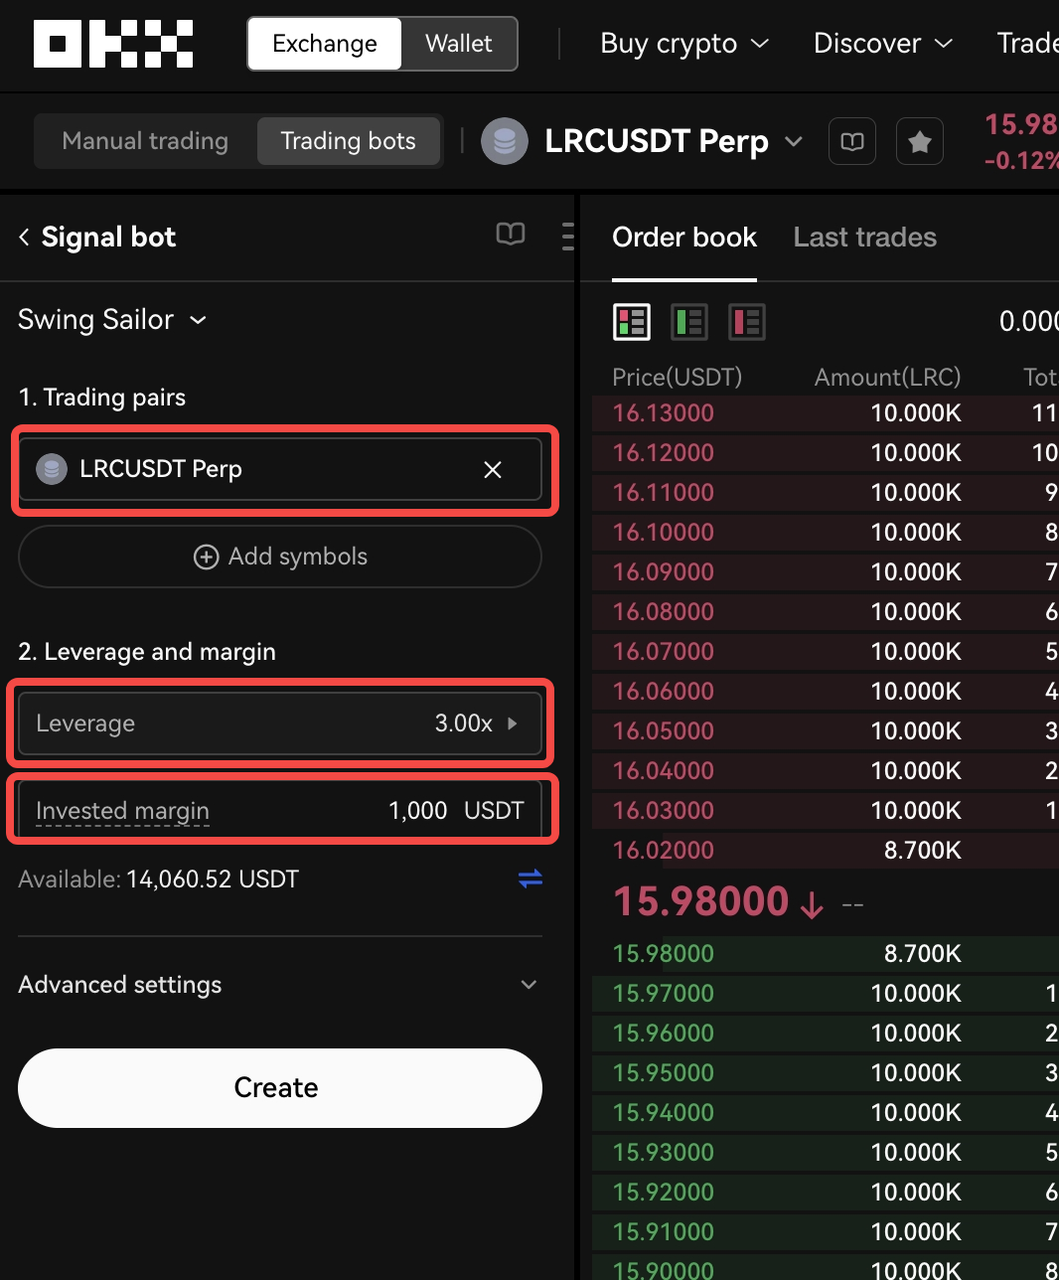
In addition to the basic settings, the bot offers advanced customization options for further fine-tuning your trading preferences.
For instance, you can choose between different order types, such as Market or Limit orders. Market orders are executed immediately at the current market price, while Limit orders allow you to set specific price levels at which your orders should be filled.
Furthermore, the entry settings enable you to define the investment amount per order, which determines the portion of your funds allocated to each trade. The portion of funds allocated to each trade is fairly customisable and can be chosen in absolute terms (e.g., 1000 USDT) or percentage terms (e.g., 10% of the available balance), giving you flexibility in determining your position sizes. Adjusting this setting allows you to manage risk and control position sizes according to your trading strategy.
Additionally, you can set Take Profit (TP) and Stop Loss (SL) levels as part of the exit settings. Take Profit establishes the price level at which your bot will automatically close a trade to secure profits, while Stop Loss defines the price level at which your bot will exit a trade to limit potential losses.
For each of these advanced settings (except for TP and SL), you have the flexibility to define them directly at the bot level or rely on TradingView alert messages to receive these parameters. This adaptability allows you to choose the method that best suits your trading style and workflow.
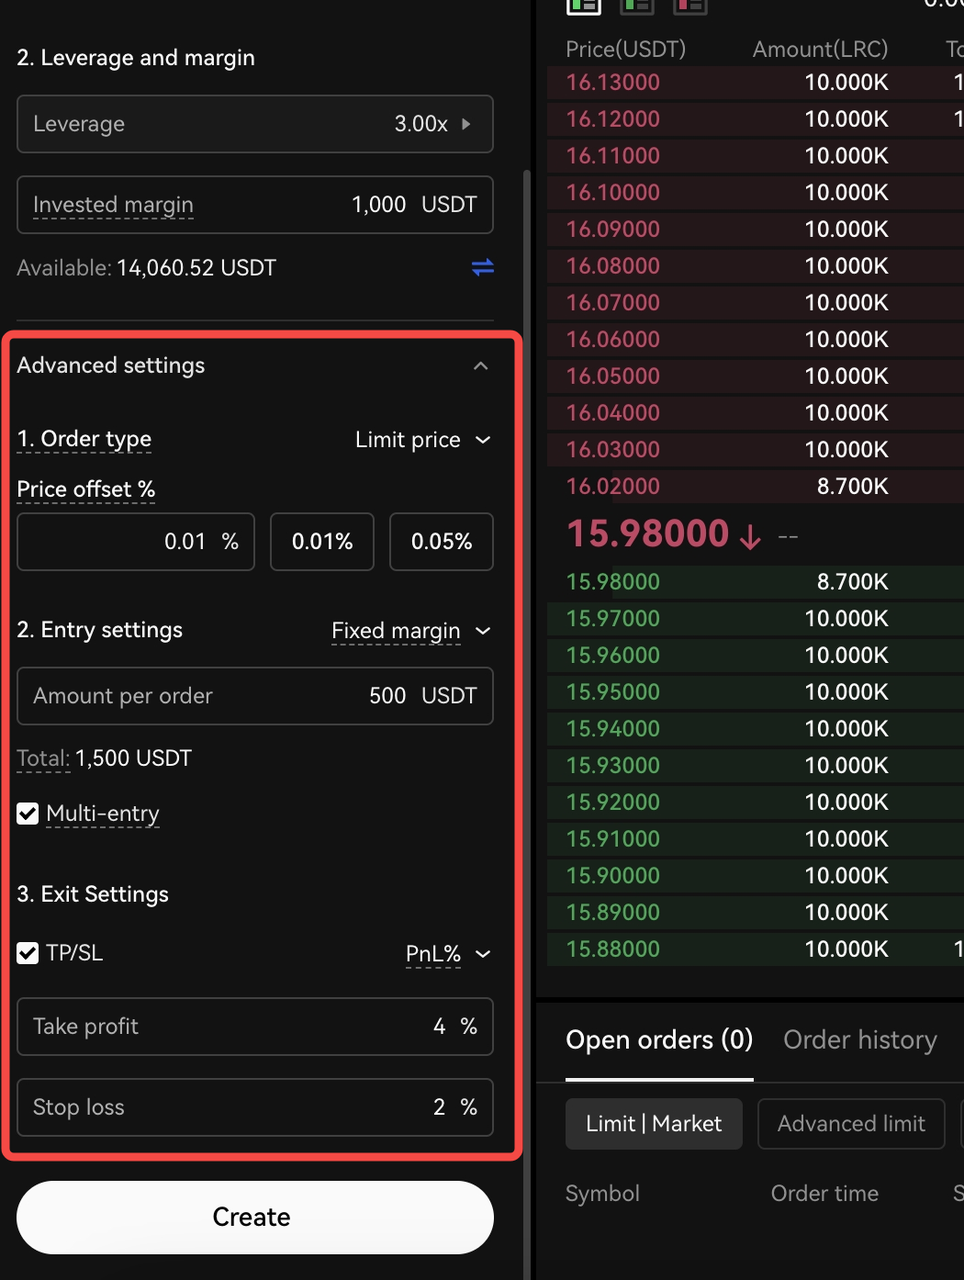
After filling in your desired bot parameters, select 'Confirm' to finish creating your Signal Bot.
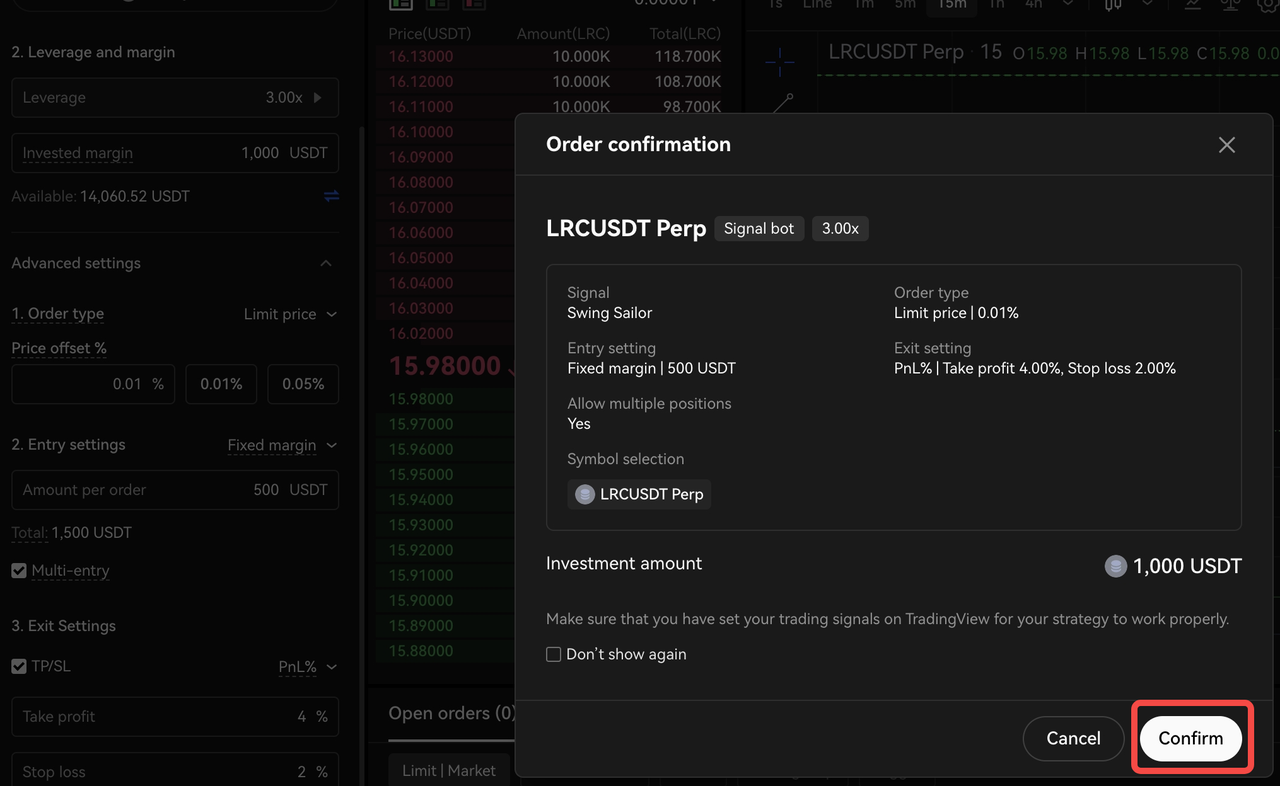
Step 5: Monitor and manage your newly created Signal Bot
Congratulations! You've successfully created your Signal Bot. This powerful tool will now listen to signals from your selected signal source and execute your trades instantaneously in real time, taking your trading to the next level.
You have full control and visibility over your Signal Bot. At any time, you can monitor its performance and access detailed information by viewing its 'Details' by clicking on the icon as shown below.

This comprehensive view allows you to track the performance history, review the list of ongoing positions, monitor open orders, and explore your positions and signal history and much more.
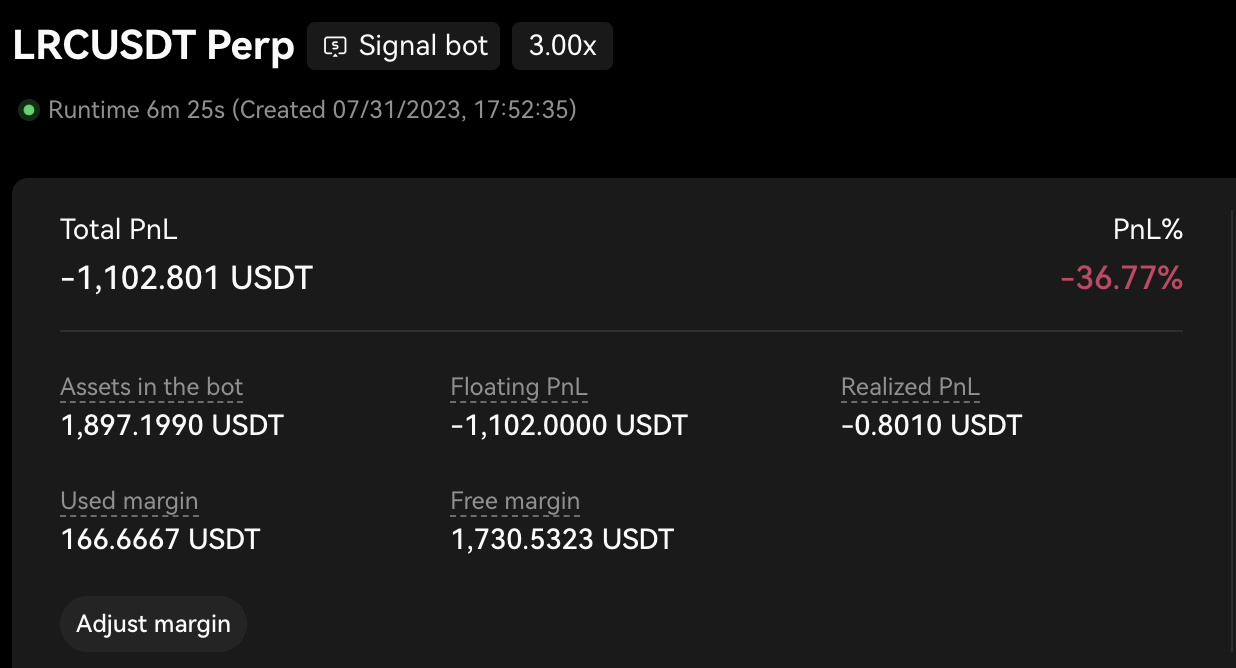
Review performance data

Track and manage open positions

Track historical positions
You can also review the logs of your signal history and corresponding processing actions. This valuable resource allows you to analyze successes and failures, enabling you to refine your approach and make informed decisions for future trades.

Track signal history
In addition, you have the flexibility to intervene manually whenever necessary. For example, you can adjust the margin allocated to the bot, place manual orders for specific reasons, control your ongoing positions, and manually close or reduce your open positions. This level of control empowers you to fine-tune your trading strategy based on real-time market conditions and your own analysis.
1. Adjust (Add/Remove) bot margin
In the Bot Details section, you have the ability to easily Add or Remove Margin from your bot as needed. This allows you to inject additional funds into the bot when desired or set aside a portion of the funds after achieving a significant return on investment (ROI).
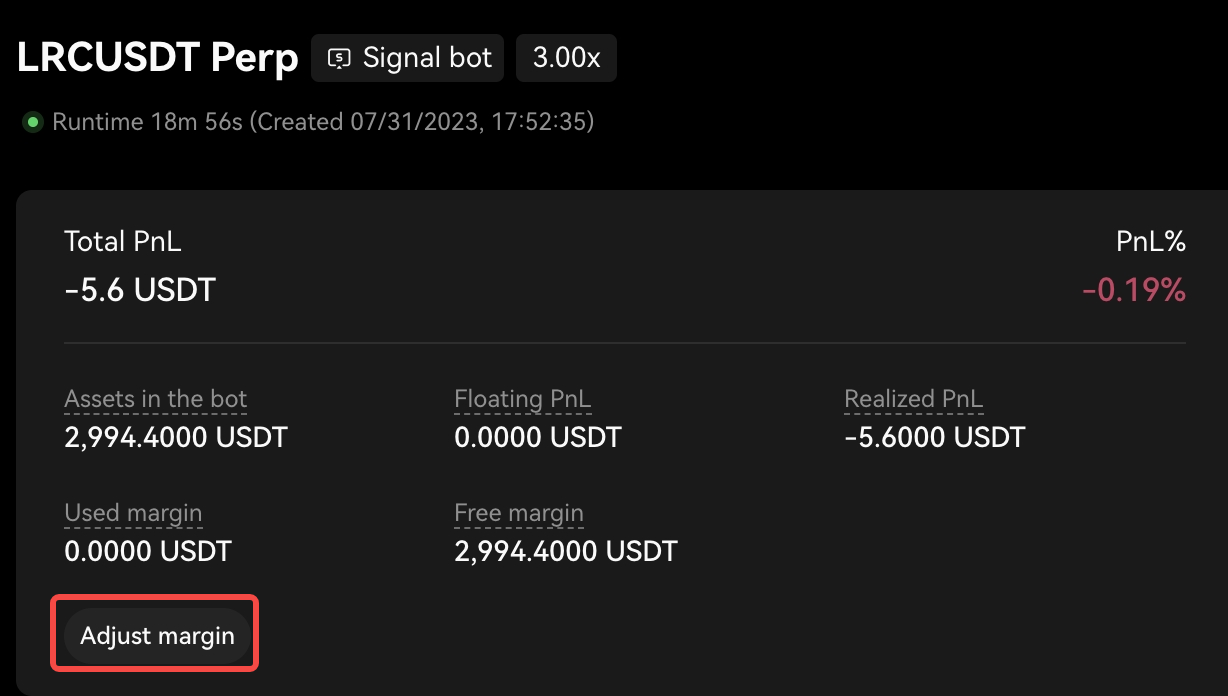
Find the "Adjust margin" button
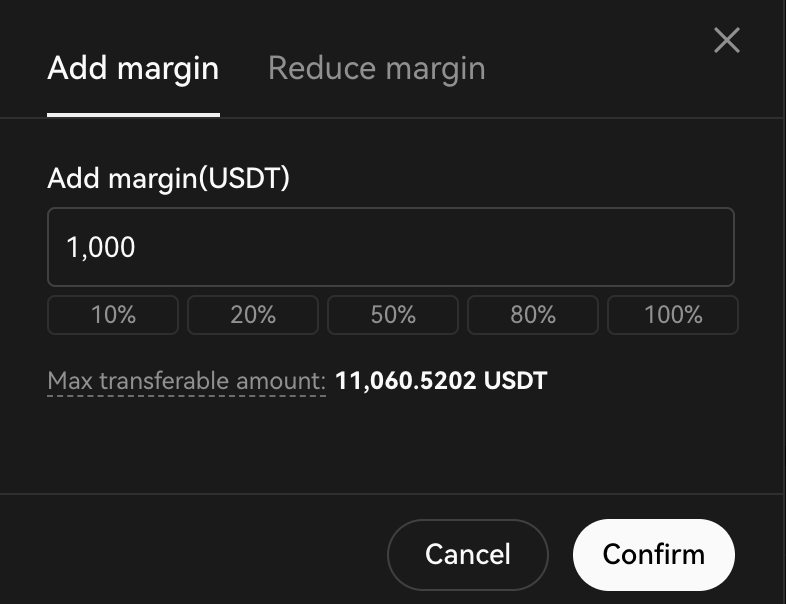
Add/Reduce Margin
2. Place manual orders
Secondly, you have the freedom to place manual orders within your bot, regardless of the incoming signals. This feature enables you to add manual orders for any trading pair according to your specific requirements. The intuitive popup window allows you to define your order settings, including the order type, amount, and direction. You can utilize this function to initiate a new position, increase an existing position, or even reduce or fully close an open position. This grants you extensive control over active position management, empowering you to make adjustments whenever necessary.

Find the "Manual order" button
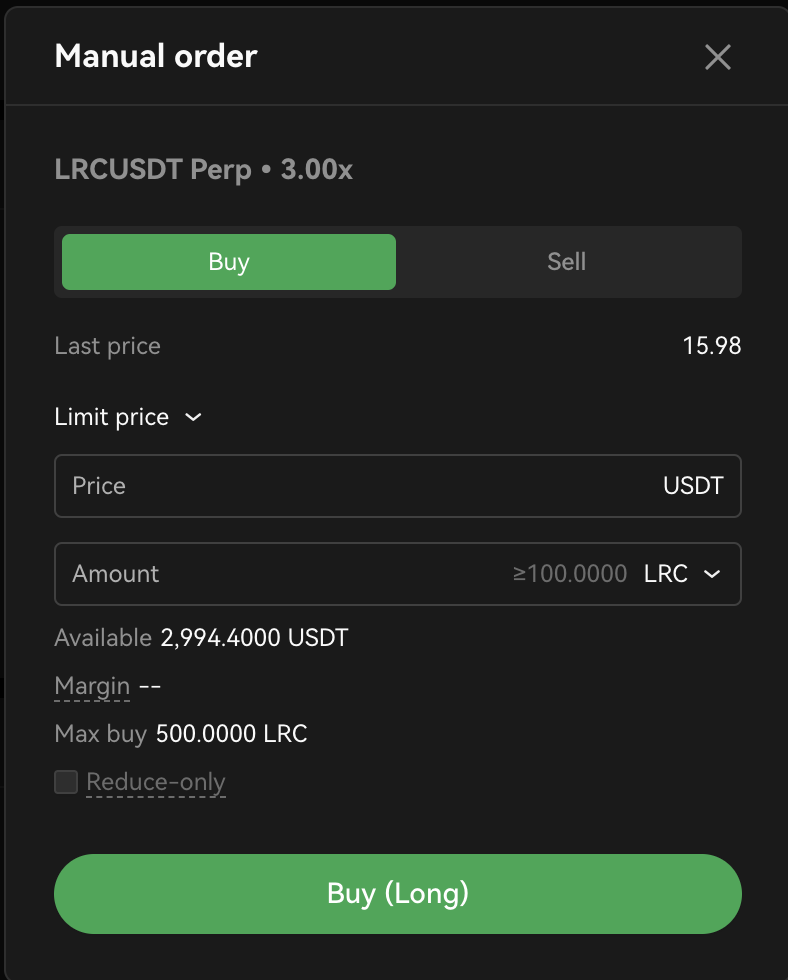
Place manual orders in either direction
3. Instantly Close Open Positions
Additionally, you have the convenience of not only viewing your open positions but also directly closing any existing open position on a specific trading pair with a simple click of a button. By doing so, you can fully close your positions for that pair at the prevailing market price. When you click the close button, a confirmation prompt will appear, ensuring accuracy before finalizing the action. It's as easy as that - click to confirm, and you're good to go.

Against every position record, there is a "Close all" button
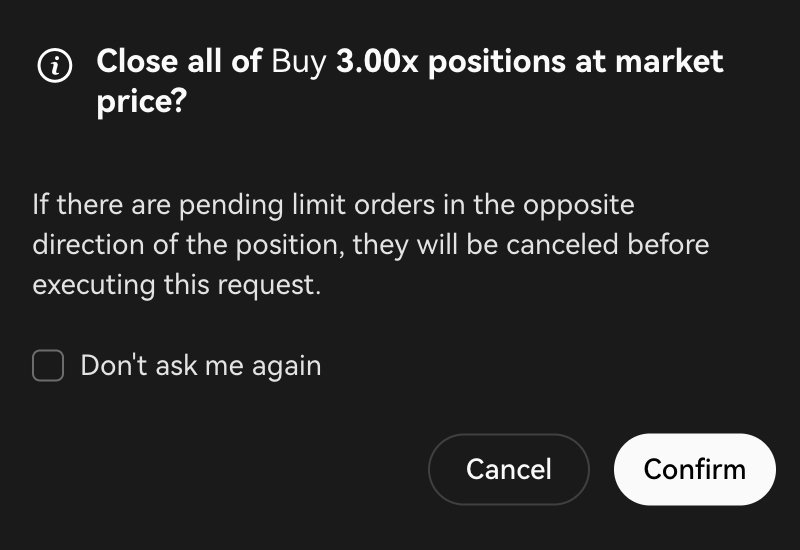
Confirm you want to close
4. Stop your Signal Bot
When you stop this bot, the system will close all open positions and cancel all pending orders under this bot. Any remaining assets from these orders will be returned to your trading account. There are two methods you can opt for when stopping your signal bot.
- Access the Bot Details
Access the Bot details page, and select 'Stop' at the top right corner.
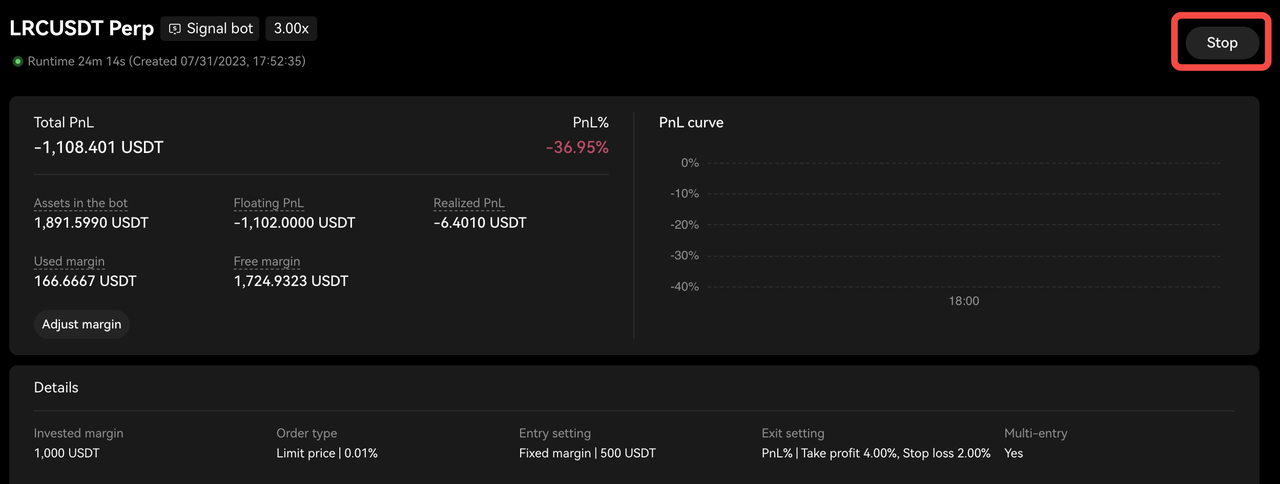
- Access Bot orders tab
Access the Bot orders tab from the Trade page, which is located at the bottom of the page.

Congratulations on successfully setting up your Signal Bot with TradingView signals! This achievement marks a significant milestone in optimizing your trading strategies and has the potential to enhance your profitability. Embrace this opportunity to navigate the cryptocurrency market with confidence and unlock your full trading potential. We wish you the utmost success on your trading journey ahead. Wish to learn about Signal Trading? Click here to find out more.
Appendix
A. Sample Case 1: MACD Script with alertcondition( ) + Alert Manual Setup
To create an alert, you need to define the condition that will trigger it. This condition can be based on various factors such as price, indicators, or custom logic. The following PineScript™ uses MACD technical indicator as an example.
//@version=5
indicator('MACD Sample Script 1', overlay=true)

// Calculate MACD
[macdLine, signalLine, _] = ta.macd(close, 12, 26, 9)

// Define the golden cross condition
goldenCross = ta.crossover(macdLine, signalLine)

// Define the death cross condition
deathCross = ta.crossunder(macdLine, signalLine)

// Use the alertcondition function to generate alerts
alertcondition(condition=goldenCross, title="MACD Golden Cross", message="")
alertcondition(condition=deathCross, title="MACD Death Cross", message="")
In this example, we first calculate the MACD using the macd function, which takes the input series (in this case, the close prices) and the parameters for the MACD (12, 26, 9). We then define the conditions for the golden cross and death cross using the crossover and crossunder functions, respectively. The golden cross occurs when the MACD line crosses above the signal line, while the death cross occurs when the MACD line crosses below the signal line.
Regarding the manual setup of alerts, this process is elaborated further in section 3 (Method B). However, for a quick overview, you would initiate the setup by clicking the "Alert" button on TradingView. From there, you'll select your indicator along with the relevant condition. The next step involves copying and pasting the appropriate alert message and webhook URL from your signal on OKX.
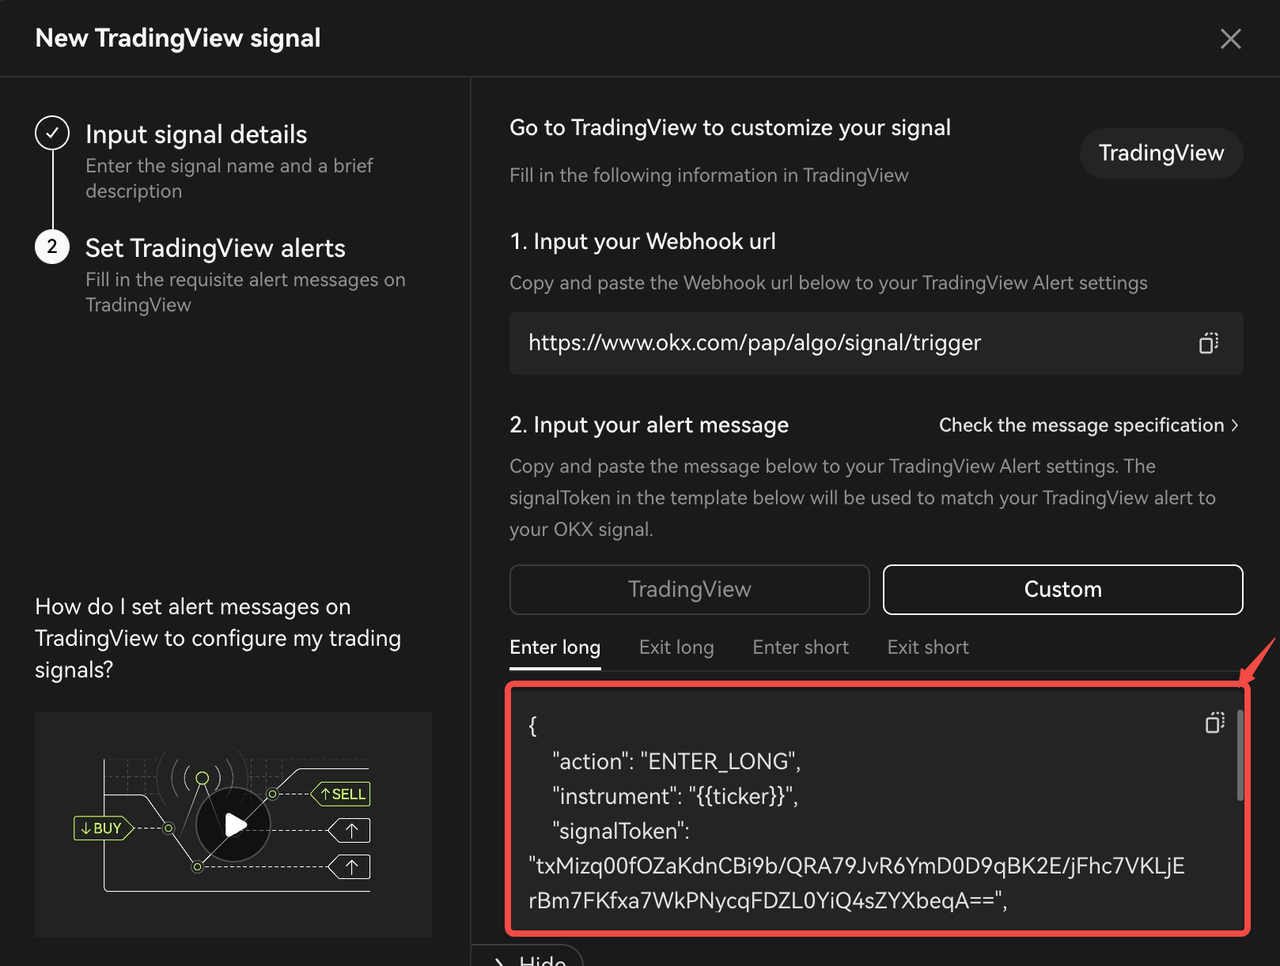
B. Sample Case 2: Python Webhook Request Example
import datetime
import time
import requests
import datetime
import json
import log

symbol = 'BTC-USDT-SWAP'

# enter long demo, using 100% available balance
signaldata_enterlong = {
        "action":"ENTER_LONG",
        "instrument":symbol,
        "signalToken":"your signaltoken",
        "timestamp":datetime.datetime.utcnow().strftime('%Y-%m-%dT%H:%M:%S.%fZ'),
        "maxLag":"2000",
        "orderType":"market",
        "orderPriceOffset":"0.1",
        "investmentType":"percentage_balance",
        "amount":"100"
    }
# enter short demo, using 100% available balance
signaldata_entershort = {
        "action":"ENTER_SHORT",
        "instrument":symbol,
        "signalToken":"your signaltoken",
        "timestamp":datetime.datetime.utcnow().strftime('%Y-%m-%dT%H:%M:%S.%fZ'),
        "maxLag":"2000",
        "orderType":"market",
        "orderPriceOffset":"0.1",
        "investmentType":"percentage_balance",
        "amount":"100"
    }

# exit short demo, closing 100% open position
signaldata_exitshort = {
        "action":"EXIT_SHORT",
        "instrument":symbol,
        "signalToken":"your signaltoken",
        "timestamp":datetime.datetime.utcnow().strftime('%Y-%m-%dT%H:%M:%S.%fZ'),
        "maxLag":"2000",
        "orderType":"market",
        "orderPriceOffset":"0.1",
        "investmentType":"percentage_position",
        "amount":"100"
    }
# exit long demo, closing 100% open postion
signaldata_exitlong = {
        "action":"EXIT_LONG",
        "instrument":symbol,
        "signalToken":"your signaltoken",
        "timestamp":datetime.datetime.utcnow().strftime('%Y-%m-%dT%H:%M:%S.%fZ'),
        "maxLag":"2000",
        "orderType":"market",
        "orderPriceOffset":"0.1",
        "investmentType":"percentage_position",
        "amount":"100"
    }

demo_trading_url = 'https://www.okx.com/pap/algo/signal/trigger'
live_trading_url = 'https://www.okx.com/algo/signal/trigger'

# Make a POST request signak enter
response = requests.post(live_trading_url, data=json.dumps(signaldata_enterlong))

# Check the response status code
if response.status_code == 200:
    log.info('trigger signal successful')
else:
    log.info('trigger sitgnal failed')
C. OKX TradingView Sample Scripts
- [Beginner-friendly TradingView strategy script] RSI strategy: https://www.tradingview.com/script/3Is1tjRU-OKX-Signal-Bot-Beginner-s-Guide-RSI-Strategy/
- [Advanced TradingView indicator script] Turtle Trading Rules: https://www.tradingview.com/script/UUKKgHCB-OKX-Signal-Bot-Turtle-Trading-Rules/
Alert Message Specifications
For more information on the OKX Alert Message Specifications, check out this article.
FAQs
If you have any questions about signalling strategies, check out the most frequently asked questions by users in this article.